TTCRD’s Anything Goes Challenge DT Card for May 11-15 using Gerda Stenier Design’s Image

Beach girl 1

Beach Girl 2

Aloha Guys!

Today I’m making a card for Through The Craft Room Door’s Anything Goes Challenge DT Card using Gerda Steiner Designs Beach Girl digital image. For all Information regarding this challenge and Full supply list, please visit the link below. I hope you like this card and please subscribe for more inspirations and ideas. Thank you

http://www.enjoyscrappin2.com
Instagram, Flickr, Twitter, Tumbler, Bloglovin
@enjoyscrappin2
#enjoyscrappin2
FB:

Thourgh The Craft Room Door:
http://craftrmdoor.ning.com

For the Beach Girl Digital Stamp:
http://gerdasteinerdesigns.com

Tupelo Deisgns LLC DT Project Using Lyra Watersoluable Crayons

IMG_8240

Aloha Guys!

Today I’m doing some coloring for Tupelo Designs LLC using this  beautiful Stampendous Build a bouquet stamp set along with Lyra Watersoluable Cryons.  This is a beautiful stamp set and it’s really fun coloring them because of their size.  These stamp sets also come with Free Stencils which is another plus!!  I’m using the watercolor crayons to watercolor because I wanted to show you that you can use this for watercoloring.

The Lyra crayon are a high quality crayon that has a very vibrant pigment so it’s easier to use.  These glide on paper like butter, it almost has the consistency of a Gelato because of it’s creaminess.  If you’ve never tried out watercolor crayons, I suggest you try them out.  They are a whole lot of fun.

I’m not making a card with this today but just sharing my coloring process for this flower.  I do have a Full tutorial on my Youtube Channel if you’d like to check them out.  All the supplies I used in this video is linked below for your convenience.  I thank you guys so much for stopping by and I’ll catch you guys next time.  Thanks

Instagram, twitter, Tumbler, Flickr, Bloglocin

@enjoyscrappin2

#enjoyscrappin2

http://www.tupelodesignsllc.com

Gerda Steiner Designs Brand New Stamp Playful Kitten Card

IMG_8238

Aloha Guys!

Today I’m sharing a card I made for Gerda Steiner Designs Brand New Clear Stamp set Playful Kitten.  Aren’t these kitties sooo Adorable!! I love them so much so I couldn’t decide which ones to use first.  I finally decided to use the kitty in the suitcase. I stamped it out on a SU’s Design paper and fussy cut it out.  I stamped out another one on a Neenah solar white card stock so that I may color the kitty using my Copic Markers.  I wanted this kitty to have a dark grey stripes so I used W9, W5, W3.  After coloring the image I then fussy cut them out.  For the suitcase, I added some color using the Vintage photo distress ink pad and added foam adhesive on it as well.  I used another SU’s design paper and used the MFT’s fishtail die and adhered it to a brown card stock from my stash.  I wanted this to look like a luggage tag and stamped a cute sentiment that says “Meow you doing”  I embellished the metal on the suitcase using my Gold Sakura belly roll pen along with Ranger black enamel accents.  I do have a Full tutorial on this card so go ahead and check it out.  Also, all the links to the supplies I used will be will be located below for your convenience.  Thank you so much for stopping by and I’ll see you guys next time.  Thank you

Instagam, Twitter, Tumbler, Flickr, Bloglovin

@enjoyscrappin2

#enjoyscrappin2

Gerda Steiner Designs Graduation Card

IMG_8136

http://youtu.be/rnDZU7kpOsk

Aloha Guys!

Today I’m sharing with a Graduation card using Gerda Steiner Designs Graduation Girl Digital Image.  This little girl is a Digital Image you can purchase and the Sentiment is also included in the set which is also a Plus!!  I Love her, she is super Cute!! I printed her out on Neenah Solar White 80lb Card stock and I cut it using the Simon Says Stamp Stitched rectangle die.  I also cut out a Design Paper using the same die and another using the Mama Elephants Femme Frame die.  All the supplies will be listed below if you’re interested.

I colored her out using my Copic Markers today and the colors I used are as also listed below.

Skin: E00, E21, E11, R20

Hair: E59, E57, E53

Cap and Shoe:  W9, W7, W5

Gown: R89, R29, R24

I also used a White Signo and Gold Signo Gel Pen for added finishing touches.  It’s a pretty simple card today and I hope you like this card and check out my Youtube channel where I have a Full tutorial on how I made this card.  I apologize that some of the coloring portion got cut off because my camcorder kept cutting off.  Thank you so much for stopping by and please check out the links below for all the supplies I used on this card.  Thank you and Mahalo:)

Instagram, Twitte, Tumbler, Flickr, Bloglovin

@enjoyscrappin2

#enjoyscrappin2

FB:https://www.facebook.com/enjoyscrappin

http://gerdasteinerdesigns.com

Altenew Sketchy Rose and Gelatos Tupelo Designs LLC

Rose 1

Rose 2

Aloha Guys!

Today I’m making a DT Card for Tupelo Designs LLC using the Altenew Sketchy Rose and Metallic Gelatos.  With Mother’s Day right around the corner, I thought I would make a Mother’s Day card using this Large Rose.  Really Beautiful!  I’m using the Tim Holtz watercolor paper, which I cut using the Lawn Fawn’s Large Rectangle die and stamped out the stem of the rose using the MFT’s Hybrid Black Ink with Fiskars stamp press.  I stamped out the rose 2 times and fussy cut them out so that I can layer the roses.  I’ve been really excited about using the Metallic Gelatos so I decided to see if I can watercolor with it, and I think it turned out Beautiful!!.  The picture doesn’t show the shimmer but in real life, the rose is very shimmery and beautiful.  After coloring the stem and the rose with the Gelatos, I also used the cracked pistachio and abandon coral to darken up some areas to add some depth.  I also distressed the edges of the stitch rectangle using Vintage photo distress ink pad.  I chose out one paper from the Prima Butterfly 6×6 paper pad and cut it to fit the entire front of my A2 size card.  I used Tim Holtz distress tool to make it look more shabby chic and distressed the edges with Vintage photo ink pad as well.  I layered the roses together and adhered it to the stem.  I added some pearls for the finishing touch and used Signo white gel pen to add some stitching around the Design paper.  I have a Full tutorial on how I made this card if you want to check it out.  All the supplies I used will be listed below incase you want to check it out.  I hope you like this card and please subscribe and follow for more inspirations and ideas. Thank you! 🙂

Instagram, Twitter, Tumbler, Flickr, Bloglovin

@enjoyscrappin2

#enjoyscrappin2

FB: https://www.facebook.com/enjoyscrappin

http://www.tupelodesignsllc.com

Gerda Steiner Designs Coffee Girl Challenge Card

Coffee girl 1

Coffee Girl 2


Aloha Guys!

Today I’m sharing a card I made for Gerda Steiner Designs Challenge Card.  Gerda Steiner Designs has Progressive challenge every month where you purchase the image of the month and participate in her challenge, then next month she’ll send you the following months image for free.  This is an excellent way to collect your digital stamp collection.  As long as you participate in the challenge every months, you’ll get an image FREE.  I think this is Fabulous and she has the most cutest critters ever, I really enjoy working with them.

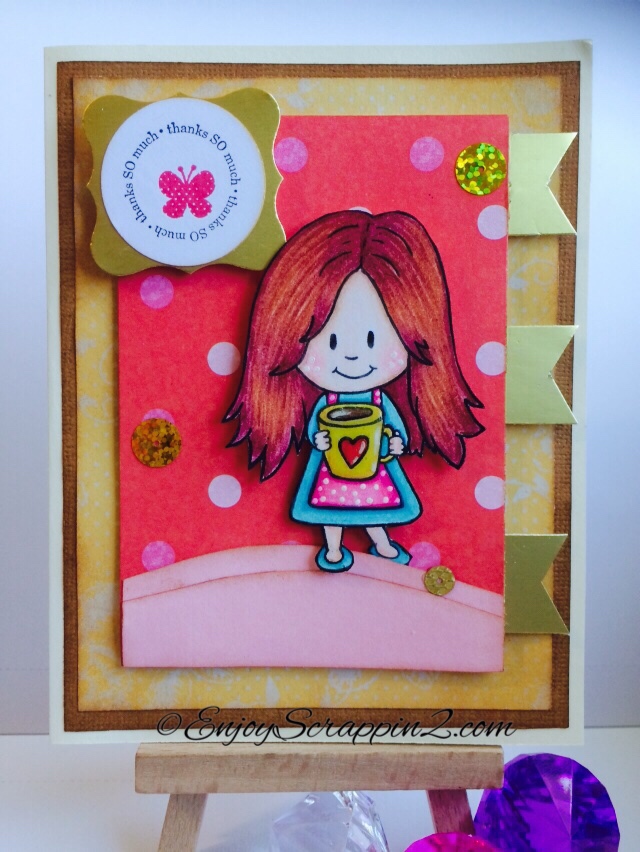
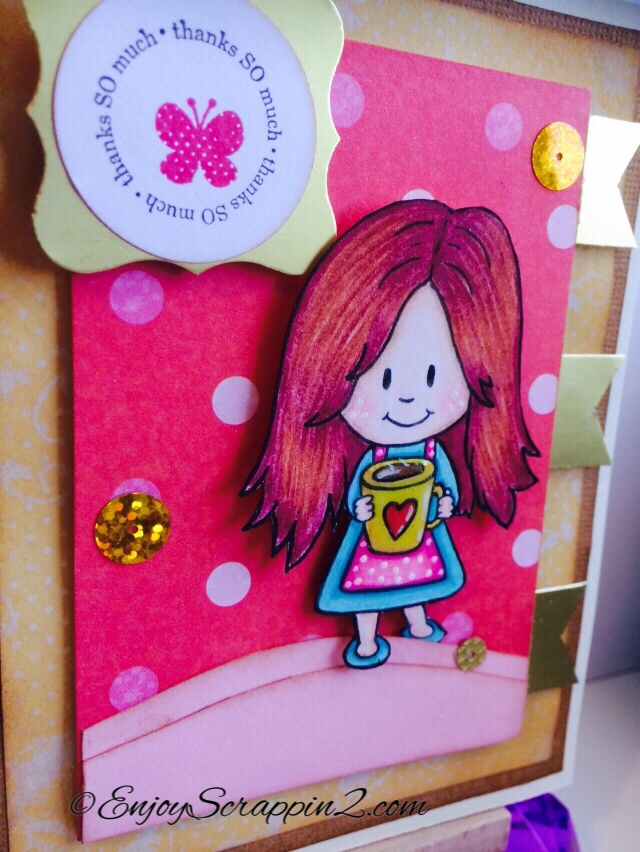
This months image is this Coffee Girl image and I didn’t have a chance to make a video tutorial for this this month but I’ll share with you what I made.  I normally always make a tutorial for these but I didn’t have time this month since the month is almost over.

I printed her out onto some Neenah Solar White 80lb paper and I colored her using my Prismacolor Pencils.  I didn’t use the gambol this time, which is a solvent for blending the color pencils.  I cut her out and added some polka dots on her apron and added highlights to the coffee and the heart on the cup.  I used this Polka dot paper from my stash which went perfectly with the color scheme and added some hills using another pink card stock.  I attached the polka dot paper onto another really light yellow design paper using some foam adhesive.  I cut little flags out of a Gold card stock and added it to the side to give more interest.  I also stamped out the sentiment and back it with the gold card stock.  I added some Gold iridescent sequins to finish the card off and added some glossy accents to the cup.

I really hope you like this card and join us for this Challenge at Gerda Steiner Designs.  I’ll leave all the links below if you want to check that out.  She also has Clear stamps available on her site so go ahead and check those out as well.

Thank you so much for visiting and please Subscribe and follow for more inspirations and ideas.


Instagram, Twitter, Tumbler, FLickr, Bloglovin

@enjoyscrappin2

#enjoyscrappin2

FB: https://www.facebook.com/enjoyscrappin

http://gerdasteinerdesigns.com

Gerda Steiner Designs Brand New Heavy Friends Stamp Card

Gerda Whale 1

Gerda Whale 2

https://youtu.be/WN_3zETFpUM

Aloha Guys!

Today I’m making a simple card using Gerda Steiner Designs Brand New Stamp set Heavy Friends.  These are her Newest Collection and this is such a versatile stamp set, I just Love them.  I’ve used the Elephant last week and made my Daughter’s birthday invitations and today I’ll be using the Whale to make a Thank You card.  I’ve used the Simon Says Stamp Wave stencil and made my water background.  I used Tumble glass, Salty Ocean, and Chipped Sapphire and blended these using a mini blending tool.  I also splashed some water on the distressed water background to give more water texture and I cut the top of it to make the wave.

I also had a Black frame cut which will be going on top of the card panel and I popped it up using some foam dimentionals.  I stamped out the whale using Momento tuxedo black ink and fussy cut it out and colored it using my Copic markers.  I’ve used my warm greys W5, W3 and W1.  I also popped up the whale on top of my water I created and stamped out the sentiment that says Thanks a ton.  I do have a Full tutorial in the link below for my Youtube video and the links to all the supplies I used.  Thank you so much and please subscribe for more inspirations and ideas.  Thanks

Instagram, Twitter, Tumbler, Flickr, Bloglovin

@enjoyscrappin2

#enjoyscrappin2

FB: https://www.facebook.com/enjoyscrappin

http://gerdasteinerdesigns.com

Altenew Stamp and Ken Oliver Color Burst Tupelo Designs LLC

Color burst 1

Color burst 2

Color burst 3

Aloha Guys!

Today I want to share a Card I made for Tupelo Designs LLC’s DT Card using the Ken Oliver Color Bursts and the Altenew Painted Poppies stamp set.  This was suppose to be a super quick card but I had so much fun with it the video became 30 min long.  This is one of the longest video that I made simply because it was kind of real time.  I knew that these color bursts had a very intense vibrant color but I didn’t realize it was this intense.  I LOVE them!!!  This is an Amazing product and a big bang for your buck.  This is a small bottle but it’s jam packed with pigment powders and when you add the water to it, it becomes these very intense colors.  You really only need a small specs of it and that’ll be more than enough to create the colors.  Even though the color is labeled on the front as one color, it actually has some mixtures of complimenting colors.  I really really loved using these and I’m sure I’ll be using them again very shortly.  Even though the video is a little long, you will experience how vibrant and vivid these color bursts can be.  Thank you so much for visiting and please subscribe for more inspirations and ideas.  Thanks so much!

Instagram, Twitter, Tumbler, Flickr, Bloglovin

@enjoyscrappin2

#enjoyscrappin2

FB: https://www.facebook.com/enjoyscrappin

For One Stop Shopping and Fast Shipping http://www.tupelodesignsllc.com  

Gerda Steiner Designs Brand New Stamp Heavy Friends Birthday Invitation

Gerda Elephant1

Gerda Elephant 2

Gerda Elephant 3

Aloha Guys!

Today I made a card using Gerda Steiner Designs Brand New Clear Stamp Set called Heavy Friends.  I’ve made a Birthday Invitation for my daughters Birthday party.  I LOVE this stamp set.  It has these adorable animals and it also has extra stamps to customize it to your needs.  My favorite is this Elephant stamp that I used for this card.  I love the fact that the elephant has his trunk raised up and you can add the water on top of his trunk or the heart, etc.  There’s so many things you can so with this stamp set.  I colored this image using my Stampin Up ink pad and Tim holts distress pad along with my finger dauber.  Since I was making about 10 of these, I decided to color it fast using the ink pads.  So even if you don’t have alcohol markers, color pencils or other mediums, you can still color your images using just your ink pads.  I also stamped out this fun birthday sentiment from Stampin Up (Retired) that you can make an interactive card.  It was made to use the spinning arrows, almost like a spinner.  I thought that was a fun addition to this card and I placed it above the elephant to make it look like his trunk is pointing to it.  I have a Full tutorial on how I made this card in the link below and I also have some supplies I used in the link below as well.  Thank you so much for stopping by and please subscribe and follow for more inspirations and ideas.  Thank you so much and Mahalo:0

Instagram, Twitter, Tumbler, FLickr, Bloglovin

@enjoyscrappin2

#enjoyscrappin2

FB: https://www.facebook.com/enjoyscrappin

http://gerdasteinerdesigns.com

Gerda Steiner Designs Penny Slider Card

Gerda Slider 1

Gerda Slider 2


Aloha Guys!

Today I’ve made a card using Gerda Steiner Designs Roller Skating Bunny.  I’ll put the link below if you’d like to check it out.  He is super Cute!! As soon as I saw him, I knew I wanted to make a Slider card.  I’ve made a standard A2 size card and I cut a Silver Shimmery card stock at 4 1/4″x5 1/2″ to cover the entire card front.  I also cut a black Bazzil card stick at 4×5 1/4″ and a Chevron design paper at 3 3/4″x5″.  I printed the bunny out on Neenah Solar White card stock and colored the bunny using my Copic Markers.

Bunny: W5, W3, W1, R20

Roller Skates: R39, R29

Cupcakes: Y39, Y17, R85, R83, R39, R29

I used 2 penny’s and adhered 2 Semi-round Dimentionals in between the 2 penny’s.  This will be out sliding portion.  I used a Stampin Up’s punch to create a slit towards the bottom of the chevron card stock.  I attached the design paper to the black card stock first before punching.  You can create a slit with a craft knife or a paper trimmer as well.  I stuck the doubled penny in the slit to see how it moved and I punched a little more at the top of the slit to help it move a little more.  I attached the bunny to the penny using my hot glue gun because I wanted it to really stick on to the penny.  Because the bunny was longer, it was going all over the place so I attached a little pull tab using the same punch with black card stock.  You pull the tab back and forth and it slides like he’s skating.  I embossed a sentiment in white embossing powder on a 1/2″ black card stock and stuck it on the top.  This finishes my card, and I do have a Full Tutorial on my Youtube channel if you’d like to check that out.  Thank you so much for visiting and please subscribe and follow for more inspirations and ideas.  Thanks and much Mahalo.

Instagram, Twitter, Tumbler, FLickr, Bloglovin

@enjoyscrappin2

#enjoyscrappin2

http://gerdasteinerdesigns.com