Your Next Stamp’s Quirky Animal Set Five With Spectrum Noir

IMG_8625

IMG_8624

IMG_8623

Aloha Guys!

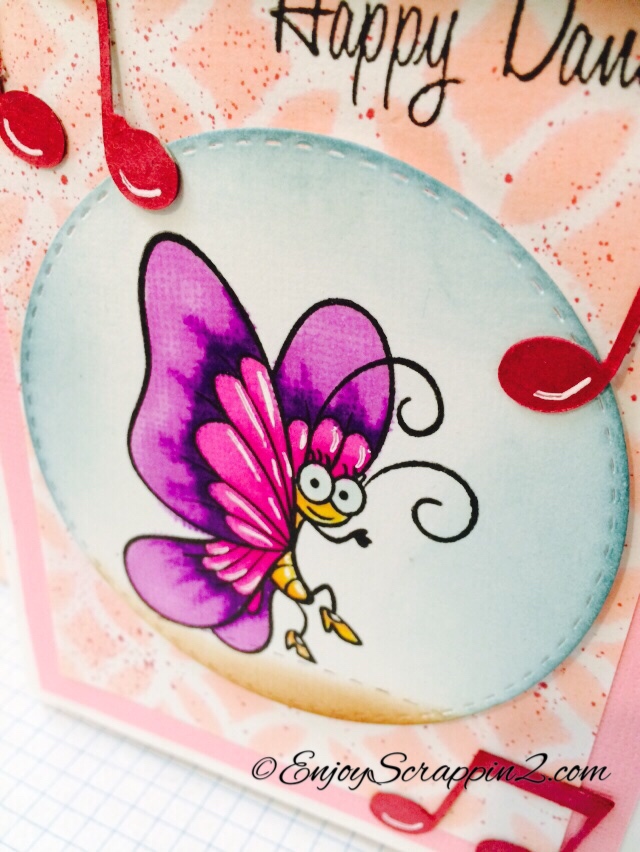
Today I’m super excited to play with this stamp from Your Next Stamp.  This stamp set is called Quirky Animal Set Five and it has this adorable dancing butterfly along with this sentiment that says “You make me do the Happy Dance!”  How cute is that.  I Love this sentiment so I wanted to use it with the butterfly.  These are actually my First set of stamps from them and they are super high quality photopolymer stamps and they have really unique whimsical designs.  I have one more set of stamps to share with you real soon, which is just as adorable as this one.  I had so much fun coloring the butterfly with Spectrum Noir Alcohol markers and I added some Music note die cut piece to embellish the card at the end.  I hope you like this card and you can see the entire process in the video link above.  I’ll leave all the links below for all the supplies I used on this card, if you want to check them out.  Thank you so much and I hope to see you guys next time.  Thanks again!

Follow me on Instagram, Twitter, Tumblr, Flickr, Bloglovin

@enjoyscrappin2

#enjoyscrappin2

http://yournextstamp.com

Gerda Steiner Designs June/July Challenge DT Card

IMG_8596

IMG_8595


Aloha Guys!

Today I’m making a card for Gerda Steiner Designs June/July Challenge card for the DT.  Gerda has a Progressive challenges every month and if you are not familiar with her challenges, here is change for you to get Free images every month.  Gerda’s progressive challenge is, you buy that months challenge image .  You use that image to participate in her challenge, then next month she’ll send you the Next months Image for Free.  Yes, Free.  As long as you participate in the challenge, you’ll be getting an image every month after that.  Pretty Amazing!!  Great chance to collect these adorable digital images.  So for the month of June and July it’s this Say Cheese Rabbit.  He’s super adorable!!  This image is not only perfect for cards, it’s also perfect for your scrapbook layout as well as for pocket letters.

Today I’m making a card using it and I color him with Spectrum Noir Markers.  I hope you enjoy the process video up above and join us for this Challenge.  I thank you guys so much for visiting and please subscribe and follow for more inspirations and ideas. I have listed all the supplies below if you want to take a look.  Thank you and see you next time

Follow me on Instagram, Twitter, Tumblr, Bloglovin

@enjoyscrappin2

#enjoyscrappin2

http://gerdasteinerdesigns.com

Gerda Steiner Designs Smart Cookie Shaker Card

IMG_8384

IMG_8385

Aloha Guys!

Today I’m making this Shaker card using Gerda Steiner Designs Smart Cookie Digital Stamp set.  I’ve made a Candy Lei and a Candy medal to pass out to my Daughter’s PreSchool friends for her Graduation ceremony which I filmed but it didn’t get record completely so I had to delete it all together so I wanted to make something to show off this Super cute image.

I haven’t made a Shaker card in a while so I decided to make it today using this image.  As you can see up above, I do have a Full video tutorial on how I made this shaker card.  I decided to make a really simple card since I had only little bit of time to make this since my daughter is home for her break.  I colored this image using my Shihan touch brush markers and I stamped out a sentiment from a Fiskars Graduation stamp set and a Graduation cap as well.  I’ve left the link below for this image if you’re interested and I thank you guys so much for stopping by.  Please subscribe and follow for more inspirations and ideas.  Thanks so much.

Follow me on Instagram, Twitter, Tumbler, Flickr, Bloglovin

@enjoyscrappin2

#enjoyscrappin2

Gerda Steiner Designs May Challenge DT Card

Skunk 2

Skunk 1

Aloha Guys!

Today I’m sharing a card I made for Gerda Steiner Designs Progressive Challenge.  If you guys are not familiar with this challenge, I advise you to check it out.  Once you purchase an image or a stamp set and you participate in a challenge, nest month Gerda will send you the next months challenge image for FREE.  That’s right, FREE.  Isn’t it awesome?  It’s a great way to start collecting images and her images are so stinkin cute!!!

This months image is the super adorable skunk.  I’ve left the link below for you to check it out.  I printed him out on Neenah Solar White card stock and I used the Specturm Noir markers to color him in.  I added some design paper and cut some things out using different dies.  I do have a Full Tutorial on how I made this card up above so be sure to check it out.  All the supplies I used for this card is listed below if you’d like to check it out.  I thank you guys so much for visiting and please subscribe and follow for more inspirations and ideas.  Thanks

Follow me on Instagram, Twitter, Tumbler, Flickr, Bloglovin

@enjoyscrappin2

#enjoyscrappin2

Personalized Name Tag Using Gerda Steiner Designs Heavy Friends Stamp Set

IMG_8303

IMG_8304

IMG_8305

Aloha Guys!

Today I’m sharing with you a Personalized Name tag I created for my daughters B-day party pack using Gerda Steiner Designs Heavy Friends stamp set. I used the same stamp set not too long ago to make her B-day invitations so I thought I would match it. I have a Full tutorial on how I made this tag so I hope you enjoyed this video and check out all the links below for the supplies I used for this tag. Thank you so much for watching and please subscribe for more inspirations and ideas. Thanks

http://www.enjoyscrappin2.com
Instagram, Twitter, Tumbler, Twitter, Flickr, Bloglovin
@enjoyscrappin2
#enjoyscrappin2

Gerda Steiner Designs Brand New Stamp Playful Kitten Card

IMG_8238

Aloha Guys!

Today I’m sharing a card I made for Gerda Steiner Designs Brand New Clear Stamp set Playful Kitten.  Aren’t these kitties sooo Adorable!! I love them so much so I couldn’t decide which ones to use first.  I finally decided to use the kitty in the suitcase. I stamped it out on a SU’s Design paper and fussy cut it out.  I stamped out another one on a Neenah solar white card stock so that I may color the kitty using my Copic Markers.  I wanted this kitty to have a dark grey stripes so I used W9, W5, W3.  After coloring the image I then fussy cut them out.  For the suitcase, I added some color using the Vintage photo distress ink pad and added foam adhesive on it as well.  I used another SU’s design paper and used the MFT’s fishtail die and adhered it to a brown card stock from my stash.  I wanted this to look like a luggage tag and stamped a cute sentiment that says “Meow you doing”  I embellished the metal on the suitcase using my Gold Sakura belly roll pen along with Ranger black enamel accents.  I do have a Full tutorial on this card so go ahead and check it out.  Also, all the links to the supplies I used will be will be located below for your convenience.  Thank you so much for stopping by and I’ll see you guys next time.  Thank you

Instagam, Twitter, Tumbler, Flickr, Bloglovin

@enjoyscrappin2

#enjoyscrappin2

Gerda Steiner Designs Graduation Card

IMG_8136

http://youtu.be/rnDZU7kpOsk

Aloha Guys!

Today I’m sharing with a Graduation card using Gerda Steiner Designs Graduation Girl Digital Image.  This little girl is a Digital Image you can purchase and the Sentiment is also included in the set which is also a Plus!!  I Love her, she is super Cute!! I printed her out on Neenah Solar White 80lb Card stock and I cut it using the Simon Says Stamp Stitched rectangle die.  I also cut out a Design Paper using the same die and another using the Mama Elephants Femme Frame die.  All the supplies will be listed below if you’re interested.

I colored her out using my Copic Markers today and the colors I used are as also listed below.

Skin: E00, E21, E11, R20

Hair: E59, E57, E53

Cap and Shoe:  W9, W7, W5

Gown: R89, R29, R24

I also used a White Signo and Gold Signo Gel Pen for added finishing touches.  It’s a pretty simple card today and I hope you like this card and check out my Youtube channel where I have a Full tutorial on how I made this card.  I apologize that some of the coloring portion got cut off because my camcorder kept cutting off.  Thank you so much for stopping by and please check out the links below for all the supplies I used on this card.  Thank you and Mahalo:)

Instagram, Twitte, Tumbler, Flickr, Bloglovin

@enjoyscrappin2

#enjoyscrappin2

FB:https://www.facebook.com/enjoyscrappin

http://gerdasteinerdesigns.com

Gerda Steiner Designs Brand New Heavy Friends Stamp Card

Gerda Whale 1

Gerda Whale 2

https://youtu.be/WN_3zETFpUM

Aloha Guys!

Today I’m making a simple card using Gerda Steiner Designs Brand New Stamp set Heavy Friends.  These are her Newest Collection and this is such a versatile stamp set, I just Love them.  I’ve used the Elephant last week and made my Daughter’s birthday invitations and today I’ll be using the Whale to make a Thank You card.  I’ve used the Simon Says Stamp Wave stencil and made my water background.  I used Tumble glass, Salty Ocean, and Chipped Sapphire and blended these using a mini blending tool.  I also splashed some water on the distressed water background to give more water texture and I cut the top of it to make the wave.

I also had a Black frame cut which will be going on top of the card panel and I popped it up using some foam dimentionals.  I stamped out the whale using Momento tuxedo black ink and fussy cut it out and colored it using my Copic markers.  I’ve used my warm greys W5, W3 and W1.  I also popped up the whale on top of my water I created and stamped out the sentiment that says Thanks a ton.  I do have a Full tutorial in the link below for my Youtube video and the links to all the supplies I used.  Thank you so much and please subscribe for more inspirations and ideas.  Thanks

Instagram, Twitter, Tumbler, Flickr, Bloglovin

@enjoyscrappin2

#enjoyscrappin2

FB: https://www.facebook.com/enjoyscrappin

http://gerdasteinerdesigns.com

Gerda Steiner Designs Penny Slider Card

Gerda Slider 1

Gerda Slider 2


Aloha Guys!

Today I’ve made a card using Gerda Steiner Designs Roller Skating Bunny.  I’ll put the link below if you’d like to check it out.  He is super Cute!! As soon as I saw him, I knew I wanted to make a Slider card.  I’ve made a standard A2 size card and I cut a Silver Shimmery card stock at 4 1/4″x5 1/2″ to cover the entire card front.  I also cut a black Bazzil card stick at 4×5 1/4″ and a Chevron design paper at 3 3/4″x5″.  I printed the bunny out on Neenah Solar White card stock and colored the bunny using my Copic Markers.

Bunny: W5, W3, W1, R20

Roller Skates: R39, R29

Cupcakes: Y39, Y17, R85, R83, R39, R29

I used 2 penny’s and adhered 2 Semi-round Dimentionals in between the 2 penny’s.  This will be out sliding portion.  I used a Stampin Up’s punch to create a slit towards the bottom of the chevron card stock.  I attached the design paper to the black card stock first before punching.  You can create a slit with a craft knife or a paper trimmer as well.  I stuck the doubled penny in the slit to see how it moved and I punched a little more at the top of the slit to help it move a little more.  I attached the bunny to the penny using my hot glue gun because I wanted it to really stick on to the penny.  Because the bunny was longer, it was going all over the place so I attached a little pull tab using the same punch with black card stock.  You pull the tab back and forth and it slides like he’s skating.  I embossed a sentiment in white embossing powder on a 1/2″ black card stock and stuck it on the top.  This finishes my card, and I do have a Full Tutorial on my Youtube channel if you’d like to check that out.  Thank you so much for visiting and please subscribe and follow for more inspirations and ideas.  Thanks and much Mahalo.

Instagram, Twitter, Tumbler, FLickr, Bloglovin

@enjoyscrappin2

#enjoyscrappin2

http://gerdasteinerdesigns.com

Make It Crafty’s FB Coloring Challenge

MIC 1

MIC 2

MIC 3

Aloha Guys!

Happy Weekend:)  Normally, I don’t really do crafting and posting on Weekends because I’m spending time with my Kiddos but I’ve been coloring this image since Friday, for the Make it Crafty FB Coloring Challenge and I wanted to finish her up.  Make it Crafty is Celebrating their 4000 Likes and she’s having all kinds of contests going on and there are Lots of prizes to be won.  I wanted to color this Fairy for the Contest and this image is called Fairy-toe-Kiss and I’ll put a link below if you’d like to check it out. It took me over 2 hrs to color her and I tried my best to record the coloring and because it took so long, my Camera battery died on me, lol.  I did record parts of it that you can check out on my Youtube Chanel, if you’d like.

I had so much fun coloring her and I’m sure I’ll be coloring her again!!  After coloring this, I cut it out using my Lawn Fawn Large Stitch Rectangle die which covers the whole A2 size Card front.  I’ve combined several of their Challeges which are, Coloring Wild hair color(not what you normally color hair with), One-Layered Card, CAS Card, and Make the Wings Transparent.

I attached her to my card front and stamped out a simple sentiment and added some sequins.  For her wings, I added clear wink of stella and put glossy accents on it to make it shiny. I also added my Signo white gel pen to put highlights on her hair and dress.  That’s just basically it.  Clean and Simple.  I had so much fun coloring her and I’ve already entered her onto the contests that’s going on the FB.  There’s still time to participate in this fun, go ahead and check out Make it Crafty’s FB Site.  Thank you so much and please subscribe and follow for more inspirations and ideas.  I thank you so much for visiting and Much Mahalo:)

Instagram, Twitter, Tumbler, Flick, Bloglovin

@enjoyscrappin2

#enjoyscrappin2

FB:https://www.facebook.com/enjoyscrappin

Make it Crafty’s FB:

https://www.facebook.com/groups/makeitcrafty/

My Youtube:

https://www.youtube.com/channel/UCSmaap84Uvp7NPOcnJXGV9A