How to Create your Own Background Paper-Gerda Steiner Designs

IMG_9195

IMG_9196

IMG_9198

IMG_9197

Aloha Guys!

Today I’m making a Clean and Simple card using this stamp set, Peekin Pumpkin Kitten along with the Happy Fall set.  I won’t be showing the coloring portion of this pumpkin but I’ll definitely show it, next time I use this stamp set for Halloween.  I just love the versatility of Gerda’s stamp sets.   I will be creating my own background paper just by using some small stamps from the Happy Fall set.  I hope you like this card and please subscribe and follow for more inspirations and ideas.  Also check out Gerda’s blog, where you can see more inspirations from the Design team 🙂  Thanks again!

Please Follow me on my Social Mdias

http://gerdasteinerdesigns.com

http://static.inlinkz.com/ppr.js

Thank You GIVEAWAY!

Aloha Guys!

Today I’m doing a Giveaway, just to say thank you to all my subscribers 🙂 If you are Not a subscriber yet, please subscribe for your chance to win these prizes. I have 3 Prizes total, so go ahead and take a look.

The Only Rules Are:
1. US Only (I apologies for my International Subbies)
2. You must be a Subscriber
3. Please leave a Comment, telling me which Prize you would choose, If you were Chosen
4. Please Leave your Email Address

I’ll be Randomly choosing 3 Winners and it’ll end on Thursday October 8th at Midnight. Winners will be notified via Email, so please leave your email. I’ll announce the winners on Friday and you have 48 hr to Claim your Prize or I’ll choose another person. I want to Thank each and everyone of you and good luck! Thanks again

http:enjoyscrappin2.com

http://www.papertemptress.com

How to Cut Your Own Handwriting on Scan N Cut

Aloha Guys!

I wanted to quickly share how you can cut your own Handwritingon the Scan N Cut.  Scan n Cut has become very popular, so I wanted to share some tips on how you can use this machine in different ways.  If you have a Scan N cut, this might be helpful, otherwise you don’t need to watch it.  Thank you so much for stopping by and I’ll be back with another video shortly.  Thanks again

Follow me on my Social Medias

For more inspirations, visit my Youtube channel:
https://www.youtube.com/my_videos?o=U

CAS Card Sets using Wplus9-Tupelo Designs LLC

IMG_9163

IMG_9166

IMG_9164

Aloha Guys!

Today I’m making some cards for Tupelo Designs LLC.  With the Holiday’s approaching, I’ll be making many sets of Cards so that I can give them as gifts.  You’ll be seeing many more of these, that’s for sure.  I decide to make a set of 4 and I made my own background paper using the Penny Black’s Blips background stamp with Rangers Dye inks.  Rangers Dye inks are very bright and I love the colors they offer.  I thought it would be fun to make different color backgrounds with the same stamped image.  When you are mass producing cards, it’s easier to do it in assembly style.  I first prepared all the card stocks that I’ll be using: 4 card bases (110lb Neenah), 4 black mats, 4 background paper, etc….

I’m using the Wplus9 stamp set, Wishing you and I chose out the 2 bunnies that has the back toward us. I stamped out 4 of them in a 2 1/2″ circle and colored them using my Copic Markers.  This is going to be very clean and simple.  It’s best to keep it that way, so that you can create these cards pretty fast.  I then assembled everything together.  I did not put a sentiment to these cards, because I like to add them later, depending on who I’m giving these too.  You can also stamp multiple sentiments on a separate piece and give them together.  Then they can choose which sentiment they want to use, and just attach it to the card.  I hope you like this clean and simple card set and I thank you guys so much for stopping by.  Be sure to subscribe and follow for more inspirations and ideas.  All the supplies I used will be located below, if you’re interested in any of the supplies I used today.  Thanks again and I’ll catch you guys next time.

Here is a Product Focus I did on these Ink Pads:

Please follow me on my Social Medias

http://www.tupelodesignsllc.com

http://static.inlinkz.com/ppr.js

2 Cards Using Gerda Steiner Designs and Papertemptress Card stock

IMG_9162

IMG_9158

IMG_9148

IMG_9160

IMG_9161

Aloha Guys!

Today I have 2 cards for you, using the new Hippo in Disguise stamp set from Gerda Steiner Designs.  I absolutely adore this Hippo, he’s super cute.  I colored him in many different mediums, which I show in the video.  I wasn’t planning on making 2 cards but it just came together.  The first one is colored with Copic markers on Cryogen White card stock from PaperTemptress.  I’ve used this card stock before, showing how nicely the marker blends.  If feels like the marker glides on top of the paper, making blending really easy.  It also has a slight shimmer, which is nice also.  If you have a hard time blending with Copic markers, you should definitely try these out.  It makes blending a whole lot easier.

This stamp set is really awesome because you can dress up the Hippo in different ways, which I think it’s super fun.  He can be a Super Hippo or a Vampire Hippo.  I’ve made both and I colored using Spectrum markers, Prismacolor pencils, Watercolor…I wanted to show you different options for coloring incase you didn’t have Copic markers.

The card stock I placed behind the Hippos are Eggplant Feltweave and Lambwood Feltweave.  These card stocks are very heavy weight and has a really nice texture to it.  I love these colors too, they go great together.  I’m also using the 110lb Neenah card stock as my base.  You can find them at Papertemptress, as well as Tupelo Designs LLC.  I recently got some more in bulk, because I ran out.  I enjoy using this Heavy weight card stock.

The second card was watercolored, using my Akashiya watercolor markers.  I really love how this turned out.  I found this panel, which was made from Brusho’s when I was playing with them the other day and it seemed like the perfect background for the Watercolored hippo.   I don’t show the watercoloring portion but let me know if you guys like to see me use the Akashiya markers again.  I hope you liked these cards and let me know in the comment, which one you like better.  All the supplies I used will be listed below if you were interested in any of the items.  Thank you so much for stopping by and please subscribe and follow for more inspirations and ideas.  Thanks again 🙂

Follow me on my Social Medias 🙂

http://gerdasteinerdesigns.com
http://www.papertemptress.com

http://static.inlinkz.com/ppr.js

Zig Clean Color Real Brush Markers-Tupelo Designs LLC

IMG_9114

IMG_9116

IMG_9117

Aloha Guys!

Today I’m making a card for Tupelo Designs LLC and I’ll be using my Zig Clean Color Real Brush Markers.  These markers are Amazing!!  I have numerous number of watercolor mediums, but these markers are by far my favorite!  You can use them with water or without.  That’s what makes these markers very unique.  It also has a real brush, rather than the felt tips we’re use to, for watercolor markers.

The stamp set that I’ll be using today is Newton’s Nook Designs Stamp set.  This stamp set is very versatile, for all year round.  It has a wagon, and it has different things you can put in the wagon.  I think that’s super fun.  I wanted to make a rainbow of wagon, stacked on top of each other, with newton on the top of the wagon, hiding behind the pumpkins.  I could only fit 5 wagons on this card, but you can easily make a whole card, just with the wagons.  I colored them with different colors using the Zig clean color markers and I didn’t use any water to blend.  I just used the markers itself, to do the blending.  I chose out a light and a dark from each color family, to do the blending.  These markers blend beautifully and they are very easy to use.  They are very highly pigmented to give you a super bright color, or you can add water to make the colors softer.  I’ll be showing both techniques today.  I colored all the images, without the water but I used water on the clouds, to give a softer look.  Please check out the video and you can see for yourself, how fun and easy these markers are to use.

Just like I mentioned in the video, you don’t need to have a ton of color  You can easily control the intensity of the color by using it with or without the water.  Tupelo Designs LLC has several different packs available but they also sell the singles as well.  What’s great about these markers is that, you can buy them individually.  Which means, you can start with a smaller set if you like, and build your collection over time.  I hope you enjoy this card and please subscribe and follow if you want to see more inspirations and ideas.  All the supplies I used will be located below, for your convenience.  Thanks again!

Follow me on my Social Medias 🙂

http://www.tupelodesignsllc.com

http://static.inlinkz.com/ppr.js

Newtons’ Nook Designs Inky Paws Challenge with Paper Temptress-Halloween

IPC_25_Halloween

IMG_9107

IMG_9108

IMG_9106

Aloha Guys!

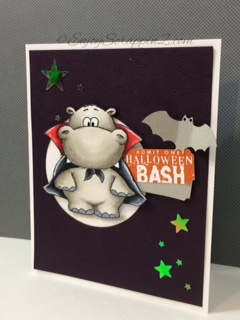
Today I made a card for the Newton’s Nook Designs Inky Paws Challenge and the theme for this challenge was Halloween.  I don’t think I own any of the Newton’s Nook’s designs Halloween stamp set or if I have them, I forgot where I put them, lol.  It’s crazy how things get lost in my craft room, lol.

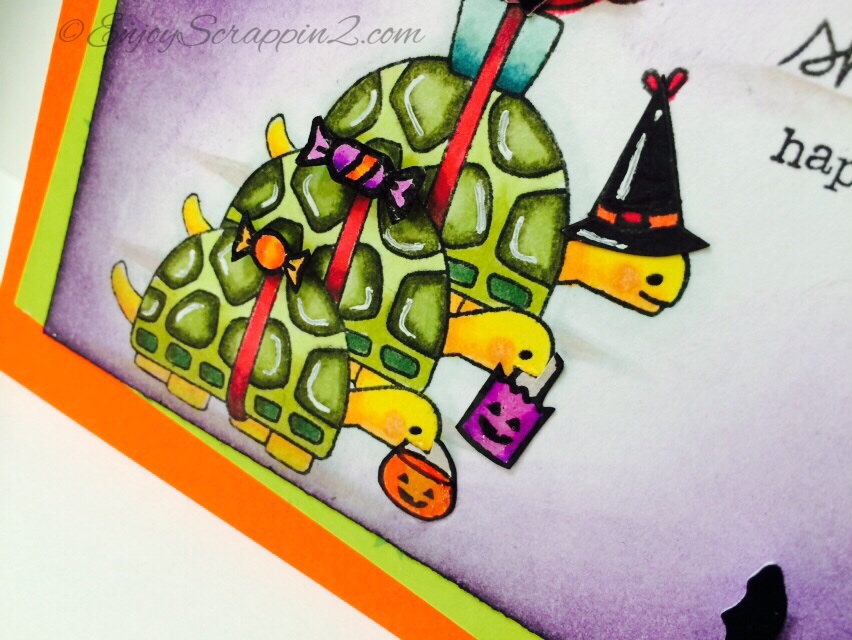
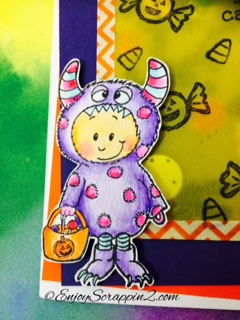
Anyways, I needed to create a Halloween theme card so I decided to use this turtle from the In Slow Motion Stamp set and created my own Halloween theme.  I don’t have a video for this card because I was really sick the whole last week.  This just came about as I was sitting in bed, just coloring random stamps.  Initially I wanted to create a Birthday card with this, since the turtle actually has a present tied to his shell.  I came up with 2 cards, almost the same design.  One is a birthday card and the other being this Halloween card.  I’ll share the other card in another time.

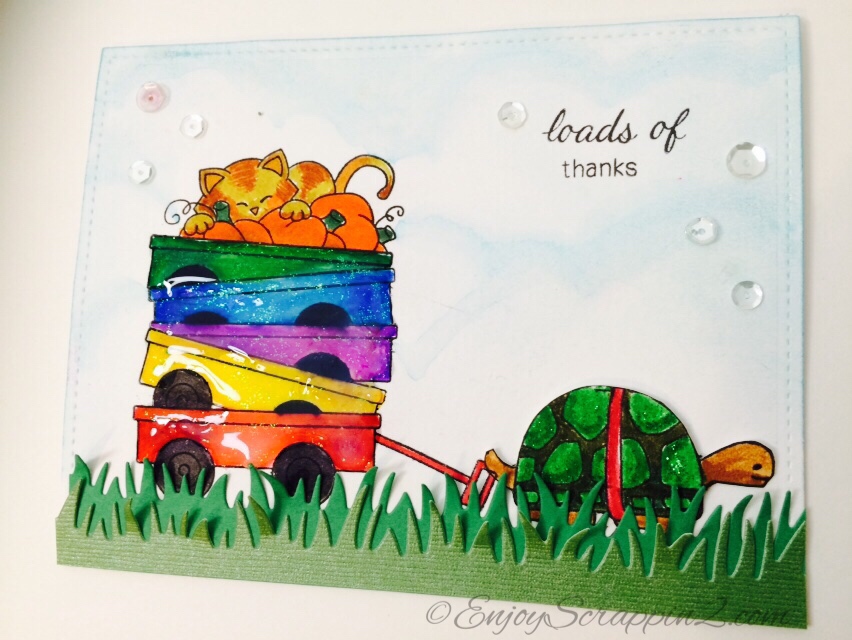
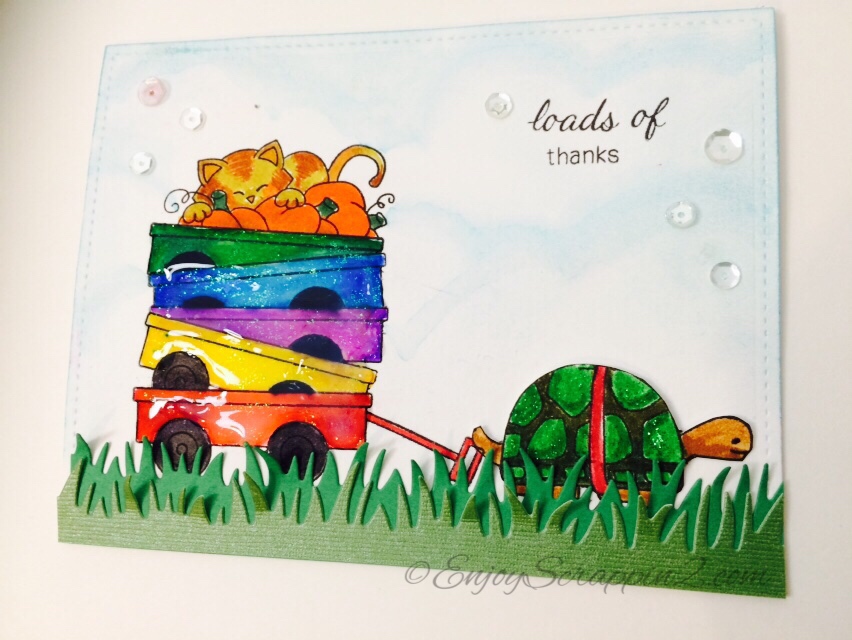
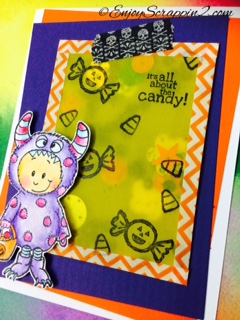
I went ahead and stamped out 3 turtles onto Neenah Solar White card stock from Paper Temptress.  One on top of the other, masking the present on his shell, except for the top turtle.  He has a present on his back but I attached a velvet bat on the present instead.  I wanted this to be a Halloween card so I went ahead and stamped out one of the party hats from the same stamp set.  I stamped it out very lightly so that I can draw in the bottom of the hat, making it into a witches hat.  I colored it black and it fit perfectly on the turtle.  I then stamped out couple of the candy bags from the Lawn Fawn’s stamp sets, which also fit in the turtles mouth perfectly.  I cut the mouth of the turtle with my exacto knife and also cut a slit on the top of the bags, so that it can fit inside the turtles mouth.  Super cute, right?  I stamped out the sentiment from the same In Slow Motion set that says Shell-abrate!  Super cleaver sentiment!  I also stamped out underneath of the Shell-abrate using a Stampin Up’s stamp.  I colored all the turtles using my Shinhan Touch Twin alcohol markers, which I use pretty regularly and it blends beautifully on this Neenah card stock.  I love these markers ❤  I also found some small candies, from another Lawn Fawn’s stamp set and attached it to the other 2 turtles.

I used Dusty concord and Black soot distress inks to ink up this panel and I used this K&C Halloween pattern paper, along with the Paper Temptress Mango card stock as well as Neenah Solar White.  I LOVE the Paper Temptress card stocks, so I think that will be the only card stock I’ll be using from now on 🙂  I then attached the whole panel to an A2 size card front and added some sequins to match the orange card stock.  I attached some velvet bat’s to give more interest to this card.  I also used my Signo white gel pen as well as glossy accents on the turtle and the shells.  I hope you like this card and if you do, please subscribe and follow for more inspirations and ideas.  Click the link below to participate in the Inky Paws Challenge, for a chance to win a prize! Also, check out Paper Temptress for all of these yummy card stocks ❤  Yay!  Thank you so much for stopping by and I’ll catch you guys next time 🙂

Please follow me on my Social Medias

http://www.papertemptress.com
http://www.newtonsnookblog.com

http://static.inlinkz.com/ppr.js

CAS Card Using Ombre Inks and Distress Stains-Tupelo Designs LLC

IMG_9074

IMG_9075

IMG_9076

Aloha Guys!

Today I’m making a CAS, Clean and Simple card using the Altenew Painted poppy stamp set.   I wanted to make it like a watercolor look so I used the Hero Arts Ombre ink pad along with the distress stains.   Please excuse my voice, I’m sick so my voice sounds horrible.  I’m not going to write to much today so go ahead and watch the video for a step by step of this card.  I thank you guys so much for stopping by and please subscribe and follow for more inspirations and ideas.  Thanks again

Please follow me on my Social Medias

http://www.tupelodesignsllc.com

http://static.inlinkz.com/ppr.js

Easy Shaker Card Using Vellum and Faber Castell Pencils-Gerda Steiner Designs and Paper Temptress

IMG_9058

IMG_9060

IMG_9061

IMG_9059

Aloha Guys!

Today I’m making a Quick and easy vellum shaker card using Paper Temptess Card stock/Vellum and Gerda Steiner Designs Rubber stamp called Monster Kid.  I’ll be using several different products today, and I’ll explain a little about these products as I go.  First off, I’m using Gerda’s Rubber stamp today, and she has Digital stamps, Clear stamps and Rubber stamps available in her store.  I use her Digital and Clear stamps all the time, but I think this is the first time I’m sharing her Rubber stamps.  Just to explain a little about her rubber stamps, her rubber stamps come in Rubber only form.  Which means, it doesn’t have the cling cushion that you normally use to stick the stamp on to your acrylic block.  You have the option to mount them onto a cling foam mount if you choose to do so. I like to use my bare rubber stamps with the Aileen’s tack it over and over glue, which I explain in the video.  Her rubber stamps are excellent quality and it’s very thick and deeply etched, which will give you a really great impression.  I decide to use watercolor pencils to color in this image and I’m using the Faber Castell’s Art grip watercolor pencils.  These watercolor pencils are highly pigmented, great quality pencils which blend really easily, as you can see in the video.  They’re available in color family sets as well as different quantity sets.  I have a few of the color family sets, and I didn’t have all the color pallet available to me, so I implemented the Peerless watercolor as well.  These are fantastic pencils, and I love them dearly.

I also made a simple shaker portion, using some of Paper Temptress’s yummy colored vellum.  I love making this simple shaker, which is simple to make yet very fun.  Her vellum is perfect for things like this, because they are very thick and high quality.  I love these purple and orange card stocks, which also has some texture to them, which will add some more interest to this card.  Her card stocks are very thick and sturdy, making them very easy to work with.  I hope you like this card and please check out the video for the step by step tutorial. I thank you guys so much for stopping by and please subscribe and follow for more inspiration and ideas.  Thanks again.

Please follow me on my Social Medias 🙂
http://gerdasteinerdesigns.com
http://www.gerdasteinerdesigns.blogspot.com
http://www.papertemptress.com
http://blogs.papertemptress.com
http://www.fabercastell.com

http://static.inlinkz.com/ppr.js

Simple Watercoloring Using Peerless Watercolors Tupelo Designs LLC

IMG_9062

IMG_9063

IMG_9064

Aloha Guys!

Today I’m making a card for Tupelo Designs LLC and I’ll be doing some simple watercoloring using the Peerless Watercolors.  The stamp set that I used are these Stampendous Jumbo Hummingbird stamp set.  I personally love their Jumbo stamp line because they are so fun to color.  They are very large so you can experiment with all types of mediums, and have fun.  Today I decided to emboss these birds using the Wow white pearl powder, which will give us this soft watercolor look.  I used the Peerless watercolors today, and if you haven’t tried these watercolors, I recommend them very much.  They come in paper form and it has a highly pigmented colors on them so they are very easy to work with.  This is one of my favorite watercolor set.  The colors are so rich and vibrant, they are absolutely gorgeous.  If you have a hard time staying in the lines when you watercolor, try embossing the stamp first.  This will make the embossed lines raise up, which will help you stay in the lines.  I just love how these birds turned out, and I love the colorful look, these birds have.  I hope you enjoyed this card and please check out the video for step by step instructions.  I thank you guys so much for stopping by and all the supplies I used will be located below if you want to check that out.  Please subscribe and follow for more inspirations and ideas.  Thanks again.

Please follow me on my Social medias 🙂

http://www.tupelodesignsllc.com

http://static.inlinkz.com/ppr.js