I just did a Haul video about 2 days ago from Tupelo Designs LLC. I got so many goodies to play with I could not wait to dig in. First, I tested out the Spectrum Aqua Markers and I do have a Full Tutorial on my Youtube channel if you like to check it out. I was really curious about these markers. The markers come in sets just like their color pencils in color Family. I got the Primary’s to try it out. I blended with a water and a brush, as well as blending it with a Dove blender pen. For more information, please check out my video.
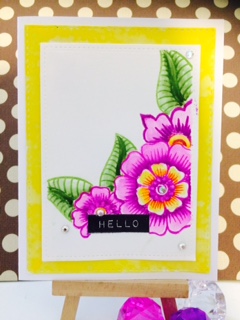
Since I had everything spread out as I was doing the Product focus video, I decided to make a quick card. I’m using the Altenew Hennah Elements as well as Label Love stamp set, which I LOVE
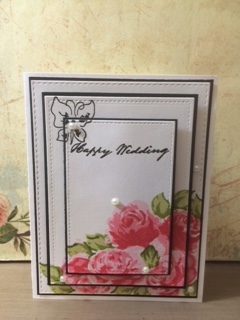
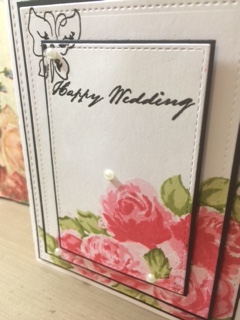
Today I’m sharing with you guys this card I made for Tupelo Designs LLC using Alte New Vintage Roses. This is also a layering stamp set that has multiple layers to create this stunning painterly look. This is an Awesome stamp set to have because it does all the work for you, all you need to do is stamp and there is your masterpiece. This stamp set was designed really well for stampers made by stampers, so they knew exactly how to create this stunning effect.
Today’s Card is basically layering and Stampining. I have 3 pieces of white card stock measuring
Large- 3 7/8×5 1/8
Medium 4 1/2×3 1/4
Small 2 5/8×3 5/8
I have 3 pieces of Black card stock
Lage 4x 5 1/4
Medium 4 5/8 x3 3/8
Small 2 3/4×3 3/4
With the 3 White pieces, line it up in the center, making sure that all sides are even. Then go ahead and stamp out your flowers and the leaves with all the layers. Press firmly since you’re stamping on 3 card stocks at once. You’ll need to make a mask for the flowers that will be over lapping as well as for the leaves. After all the stamping is done, I also used the same sentiment from the same set and stamped it out using Versafine Onyx Black pigment ink and embossed it with Clear embossing powder. I thought the top of the card panel looked empty so I also pulled out the Painted Butterflies set and stamped a small butterfly at the top left corner above the sentiment.
Attach the white card stock the coordinating black card stock leaving about 1/16th of a border all around each piece. My card base today is Neenah 110lb. Card stock which I cut it as a A2 size card panel. I attached all the components together, using foam adhesive for the top 2 layers. I also added some pearls and clear wink of stella for the last finishing touches. I do have a full Tutorial on my youtube channel if you’d like to check that out. I hope you enjoyed this card and please subscribe and follow for more inspirations and ideas. All the supplies I used will be listed below for your convenience. Thank you so much for stopping by and Much Mahalo
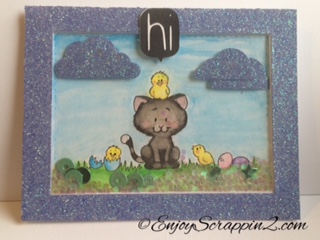
Today I’m making a card for Gerda Steiner Designs March Challenge Card. I’ll be making a Shaker card today, I love shaker cards:) For those of you that are not familiar of this Progressive Challenge that Gerda has, I’ll explain a little about it.
Once you purchase an image and participate in the current challenge she has going on. Next Month, she’ll email you the following month’s challenge image for FREE. This is an ongoing thing as long as you participate in her challenges, which is super Awesome!! This month’s image is this Kitten with Chickens. I’ll leave a link below if you’re interested.
Today I’ll be doing some watercoloring so I printed this image out on watercolor paper. When I’m printing a Digital image on watercolor, I print them out on 90lb. Strathmore paper so it doesn’t jam in my printer. I then cut out the image using the Lawn Fawn’s Large Stitched rectangle. I also cut a glitter card stock as well as 6 frames that’s bigger that my focal panel to create a frame for my Shaker.
I colored this using a Simply Art watercolor pallet. This is a very inexpensive watercolor set that you can purchase for $6-$8 depending on where you get them. This is my first time trying these out and surprisingly, the colors were very vibrant. I noticed that it does give a chalky finish once the paint dries. If you rub your fingers across it, it rubs off on your fingers a little. So you might want to use some type of fixative on it if you’d like. For me, this was going inside a shaker, so it didn’t bother me but in the future, I might add some fixative. I out together my shaker card and put some paper cut sequins, stars and hearts out of several dies and also added some iridescent glitter inside. I didn’t use any foam adhesive today, instead I made the dimension using card stocks. I do have a Full video tutorial on this on my Youtube if you like to check that out. Thank you so much for visiting and Please subscribe and follow for more inspirations and ideas. Thanks so much and Mahalo:)
Today I’m making a card for Make It Crafty’s Clean and Simple DT Call. If you’ve been following me on Instagram and Facebook, you’ve seen that I’ve been obsessed with Make it Crafty’s images. I colored the Characters when I did a Product focus on the Spectrum Noirs and I love coloring the Flower set that has the Beautiful Rose. I love coloring and I’m in love with MIC’s images, I want to buy them all, lol
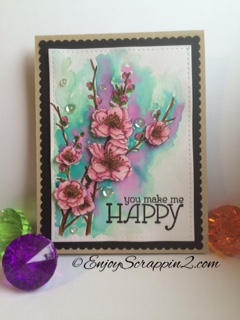
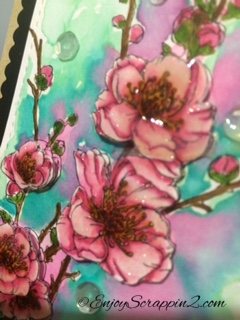
For my card today, I’m using their Newest Release of Spring Flower set. I fell in love with the Cherry Blossom as soon as I saw them and I couldn’t wait to get my hands on them. If you purchase the set which includes 4 flowers, you automatically get 15% off which is super good deal. That’s what I bought, but you can definitely purchase them individually.
I printed the Cherry Blossom out on Strathmore 80lb. watercolor paper and cut the image out of Mama Elephant’s Femme Frame die. I also cut a black Bazzil card using the same die but I used the Scallop one. My card base today is Neenah Desert Storm 100lb. I printed several of these flowers and I colored them using Tim Holtz Distress markers using a Stampin up blender pen. You can use any blender pen you have, you can even use a water brush ins tread. In my opinion, the blender pen gives more control and this is perfect since the background is going to be very loose. After coloring some of the Cherry blossom and I fussy cut them out to give more dimension to my front panel.
For my background, I used the Cracked Pistachio and Peacock feathers and made a very loose background for my Flowers. I also put Picked Raspberry on all the flowers with lots of water so it’ll kind of ooze out and blend with the background I created. I rally love this loose watercoloring! For the sentiment, I used a stampin up’s stamp set and I embossed it using Versafine Onxy pigment ink with clear embossing powder. These Flowers DO Come with Sentiments so you can use those if yo like.
I attached everything together and added some Pretty Pink Posh Clear sequins in different sizes. I also put some clear Wink of stella and put Glossy accents on the popped up Cherry Blossoms. This finishes my card for today and I hope you enjoyed. All the supplies I used in this card will be located below, for your convenience. I’m Crossing My Fingers!!! I would LOVE to be one of their DT members!!! This will be such a great experience and if I don’t get Chosen, that’s Ok too. I’ll still be enjoying her images:) Thank you so much and Much Mahalo!
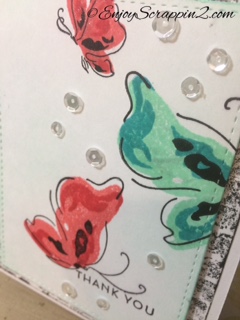
Today I made a card for The Tupelo Designs LLC’s DT Project using the New Alte New Stamp set, Painted Butterflies. This is a very Beautiful stamp set that basically does all the work for you. This is also a 3 Step stamp set which means there’s different layers that can go on top of each other to create this multi colored painted look. This is a very popular set so it might be sold out but at Tupelo Designs LLC, you can Pre-order them so you’ll have yours as soon as it becomes available. And you know how Fast Their shipping is, Amazing! I’m also using another New stamp set from Impressions Obsessions which also can be Pre-ordered. It’s a distress brick wall, and it has so much texture, it’s really cool. I’m using a lot of New products today, I might as well play with them all at once, right? Lol
For my card base, I have a top folding A2 size card stock which is Neenah, by the way. I also cut another white card stock measuring 4″x%5 1/4″ and another cut using the MFT’s stitched rectangle die. I’m going to make my own background paper using the Obsessions Impression’s Background stamp inked up with Tim Holtz distress mini ink pad. I do have the whole collection of the full size ink pads which I still use, but sometimes the little ones are just easier. I stamped out the brick wall and put it aside and will work on our focal panel. I stamped out the Thank you sentiment using the same Alte New stamp set and I stamped out one of the butterflies using the New Cracked Pistachio and Peacock feathers. The 2nd butterfly was stamped using the New Abandoned coral and Festive berries. I also stamped out a small butterfly using the same abandoned coral. After doing so, I attached some Cartwright Moonshine sequins and added some Wink of Stella clear pens on the butterflies for the finishing touch. It’s super easy and simple but it looks like you took a while to make this card. I do have a full tutorial on my Youtube Channel with more description of this 3 step stamping. I hope you enjoyed this cad and please subscribe and follow for more inspirations and ideas. Thank you, and Mahalo:)
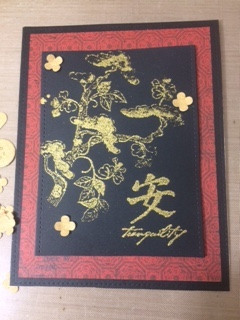
Today I’m sharing a card I made for the Oriental Stamp Art Yahoo Group’s Red/Gold/Black Swap. I made this card ending of February, I think but I didn’t want to post it right away because I wanted my Swap partner to receive their card first. Oriental Stamp Art aka OSA is a yahoo group that enjoy Asian art. It is a closed group but if you ask to join. they’ll be more than happy to have you on board. They are all so sweet:) The theme for this card was Red/Gold/Black, which meant those were the Only 3 colors we can use. It was a bit challenging since we couldn’t use any white card stock, which is a staple in card making. So I decided to make a Simple card. The stamp sets I used here are from http://www.artneko.com and they carry a variety of Asian stamps. They have really great quality of Red rubber stamps with both clung form and bare rubber, which is a little cheaper. I have quite a good collection from them:)
For my card, I decided to use this older Basic Gray design paper which I bought a while back when I was in LA and it was one of those Sale paper’s that came in a 25 pack of 12×12. I bought it because it reminded me of an Asian paper and I used this quite often when I’m making an Asian themed card. Since I can only use the 3 colors, this design paper was perfect with the black and the red. I also cut 2 pieces of black card stock using the Lawn Fawn’s stitched rectangle die in the Largest and the second largest die. The large black panel will cover up my entire front panel of my card and I’ll put the design paper in between the 2 black pieces i cut. With my smaller piece of the black card stock I stamped out the tree and the sentiment using versa mark and used the Ranger’s Enchanted Gold embossing powder to emboss it gold. It gives a super sparkly look against the black and I added some punched out gold card stock pieces to add some finishing touches. I hope my swap partner likes this card. I had a lot of fun participating in this swap and I’m sure I’ll be participating in more of their challenges and swaps. I hope you enjoyed this card and I do have a full tutorial on how I made this card on my Youtube Channel if you’re interested. Thank you so much for stopping by and Please subscribe and follow for more inspirations and ideas. Thanks so much, Mahalo
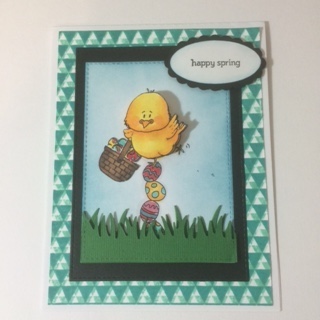
Aloha Guys! Today I’m sharing with you this Super adorable Chick standing on this Pile of Easter eggs by Gerda Steiner Designs. This Chick is so cute and I had a lot of fun working with this. I put the Chick on a DIY Action Wobble and I have a tutorial on this which I made a while back. I’ll put a link below if yo want to check that out. This is a digital image and I printed this out 2x so that I can pop up the Chick on the wobble so it has movement. I cut out this panel that I printed using the MFT Stitched Rectangle die and also cut out a black card stock with a larger die so I can have a mating for my Chick. I colored this image using my Cpoic Markers and gave him a Basket full of Easter eggs that I stamped out with one of an older Stampin Up Collection. It just happened to fit the size perfectly for my Chick. I also cut couple pieces of green card stock using the Lawn Fawn’s Grass border die and put it at the bottom for grass. I also used My Hero Arts Tiny Flag die to make my own Design paper for my front panel as well. I do have a full tutorial on how I made the card on my Youtube Channel if you’d like to check that out. Before you know it, it’ll be Easter so why not start a little early so you won’t have to hurry at the last minute:) I’ll be making some treat bags and Goodies for the teachers for my kids soon so stay tuned for those. Thank you so much and I hope you like this card and please subscribe and follow for more inspirations and ideas. I have the supply list below if you’re interested in the products I used today. Thank you and Mahalo:)
Today I’m sharing a quick post while I’m playing around with my New Spectrum Noir Alcohol Markers and my New found Favorite Digi site, Make it Crafty. They carry both Digital and Rubber Stamps and I am in Love with their images. I purchased several images, and a lot more on my wish list, lol Look at this beautiful Rose!! My First attempt coloring with my New spectrum Noirs and trying to get use to the different tip, then I’m use to. I’ve had some questions regarding the SN and I will soon be doing a Product Focus on these markers. They are very Different than the Copics and there’s definitely a learning curve for me for me anyways, but these are really good markers.
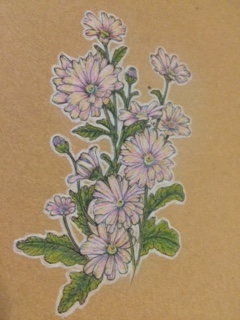
This is also an image I purchased from Make it Crafty, there was a set of 4 Beautiful flowers. I printed this on a kraft paper and used my Prismacolor pencils. I wanted this daisy to be white with a slight pink to it because I wanted to post it to their Color Challenge. Their color challenge was Kraft and Pink and I tried to add some pink to this daisy. I hope you guys enjoyed this quick post and please subscribe and follow for more inspirations and ideas. Thanks so much, Mahalo
Today I want to share this Balloon shaped card that’s also a Shaker card. I haven’t made a shaped card in a while so this was kind of fun. On top of that, I absolutely Love these Monster!!! This is a Digital image and the set has All 3 Monsters, I’ll leave a link below if you want to check it our. First I made my Balloon Card base using Simon Says Stamp’s Balloon Die. This die set has multiple sets of Balloons in it so the set is very versatile. I then cut another balloon using the same size as my base for my card front, using watercolor paper. I used that piece and cut out 3 circles using the SSS In Stitches circle die. This has stitching on both the negative and the positive side so my circles that I cut has stitching on it, which is pretty cool. I also used the same dies to cut myself an Acetate and some foam which I’ll use for the shaker portion.
I printed All 3 Monsters onto a Neenah Solar White paper and I couldn’t decide which one to use so I decided to used all 3. I colored the monsters using my Copic markers. I used the Inktense Pencils on the watercolor paper to add some color to the Balloon panel. I used 3 different colors for the 3 circles and then used a brush and water to liquify the colors. I tried to match the hole to the color of the monsters. I then used the Peacock Feathers on the rest of the balloon. I attached the acetate to the front balloon and attached the foam. In the circles I added some small seed beads, I didn’t add to much because I didn’t want to cover up the monsters. I added some bakers twine bow at the knot of the balloon, and put a Happy Birthday sentiment. I do have a Full Tutorial on how I made this card on my Youtube Channel, if you’d like to check that out. Thank you so much for watching and Please subscribe for more inspirations and ideas. Thanks again, Mahalo
Today I’m sharing my First DT project fur TupeloDesignsLLC. I’m very excited for this opportunity and you’ll see a lot of projects for them in the future:)
Today I’m doing some Watercoloring using Koi Pocket Field Sketch Box with 24 colors. If you’ve been watching any watercolor tutorials on YouTube for cards, you probably have seen this watercolor set being used a lot. This watercolor set has a Very Intense pigment so it’s very easy to achieve colors on images fast. It’s conveniently packages with a water-brush for those on the go. I’m also using the Stampendous Large Butterflies Trio set and I’m using the largest one. I embossed it using Versamark with Hero Arts White embossing powder onto Tim Holtz Watercolor paper. Which is conveniently cut to a card size and I used my favorite Milwaukee heat gun to melt the powder. For the Watercolored butterflies, I worked on it section by section. I drop some clean water onto where I’m coloring and just dropped in the paint and let the water do all the coloring for me. The colors will only travel Only where the water is. I blended the Blue and the Purple which I think is a perfect combination. I then Splattered some paints using the same colors to give a unified look. For a Full Tutorial on how I made this card, please check out my YouTube channel, which will be listed below. I’ll also leave a supply lust below for your convenience. They also have FREE Shipping on purchases of $65 and over and they also have flat rates shippings depending on the amount you spend. They now have A Loyalty Program where you can accumulate points to spend on your next purchases. Joining is FREE and when you first join, you’ll automatically get 500 points and after that you get 2 point for each dollar you spend. I think that’s Awesome!! They carry a variety of products for variety of crafters so go check them out. If you don’t see what your looking for, please email Mike and Mike’s email is always at the bottom of the website. They are always open to your suggestions!! Also please check out Jane’s Youtube Channel where she’ll do Product shares and some Amazing Mixed Media work. Thank you so much for visiting and please subscribe for more inspirations and ideas!! Thanks so much, Mahalo