Rangers New Dye Inks from TupeloDesignsLLC

2015/02/img_7669.jpg

Aloha Guy!

Today I’m doing a Product Focus!! I decided to do a Series of Taking a Closer look at different Products. Hopefully this will give you guys a Better Knowledge on a particular product you may have wondered about. I’m going to say this in Advance. I am NOT an Expert by any means and I Do Not Work for Any of These Companies. I just want to share what I wanted to know myself, before making a purchase so hopefully this will help you guys out too:)
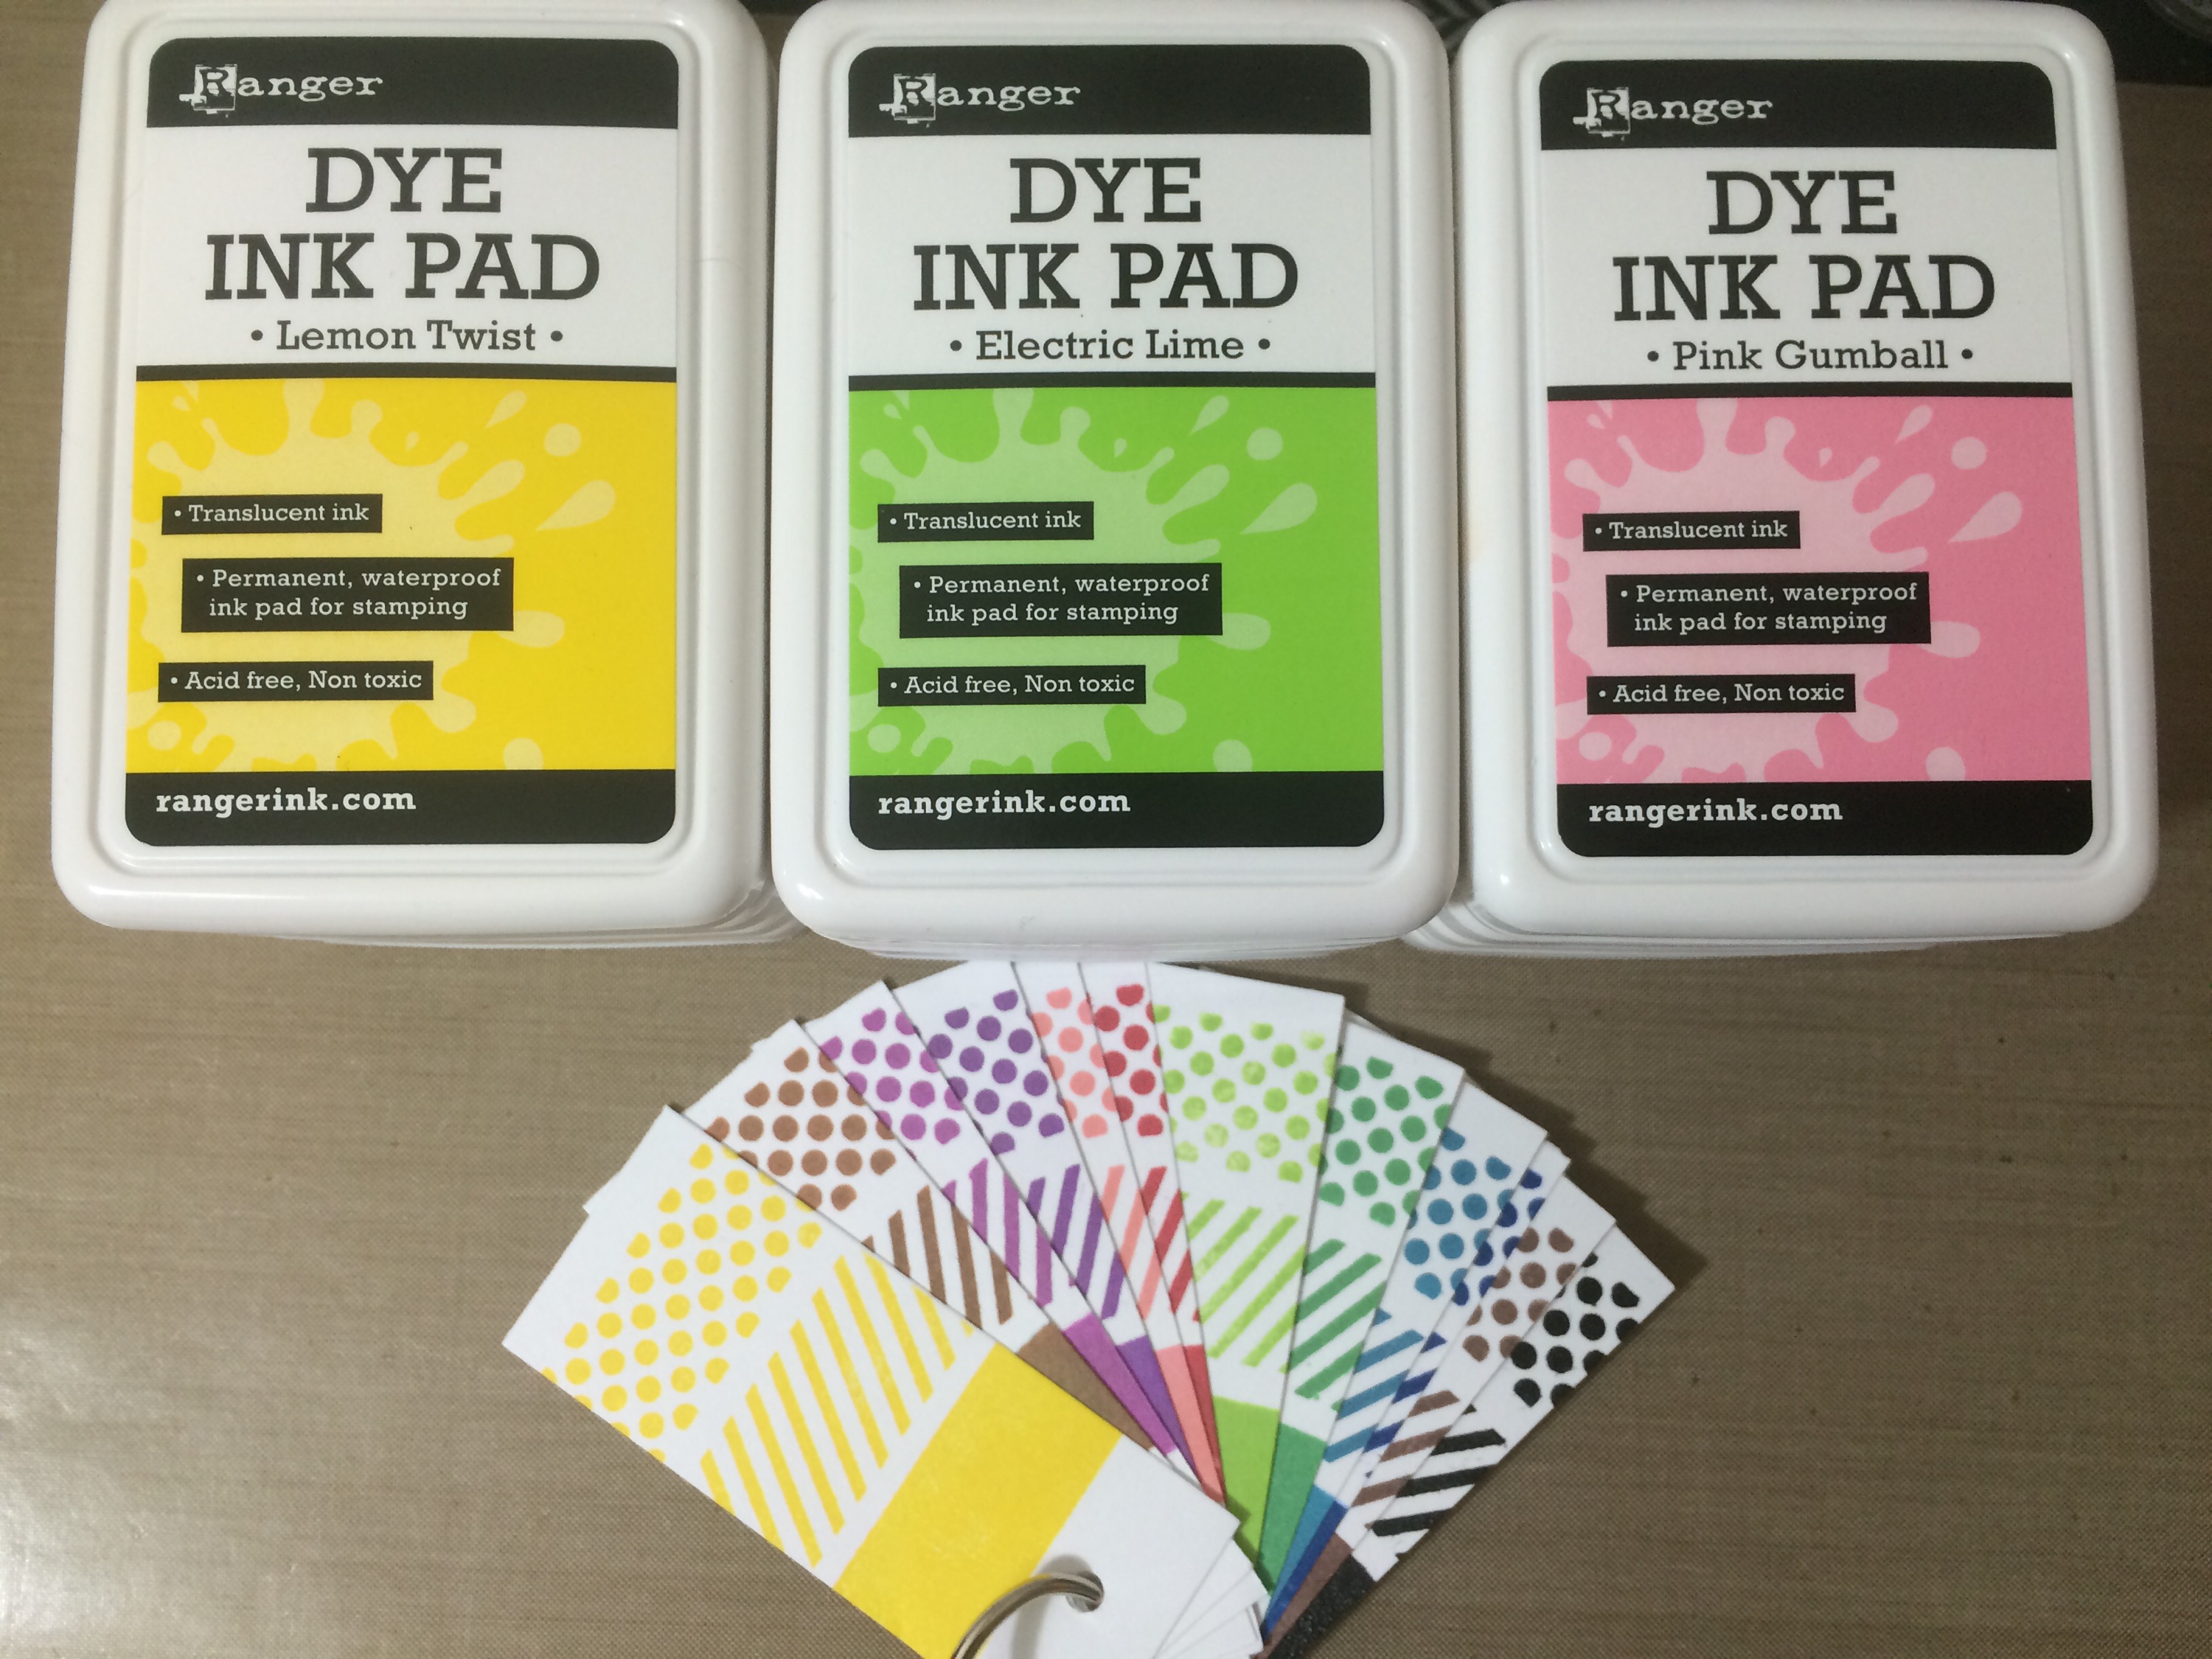
Today’s product Focus is the New Ranger Dye Ink Pads. Were you guys curious about these?? I sure was!! You guys that have been watching and following me for a while, know that I am an Ink Pad Addict, lol. These Ink pads were Provided for me from http://www.tupelodesignsllc.com as a DT Package, along with the Tim Holtz New Watercolor Stamp set, which I’ll be using today.
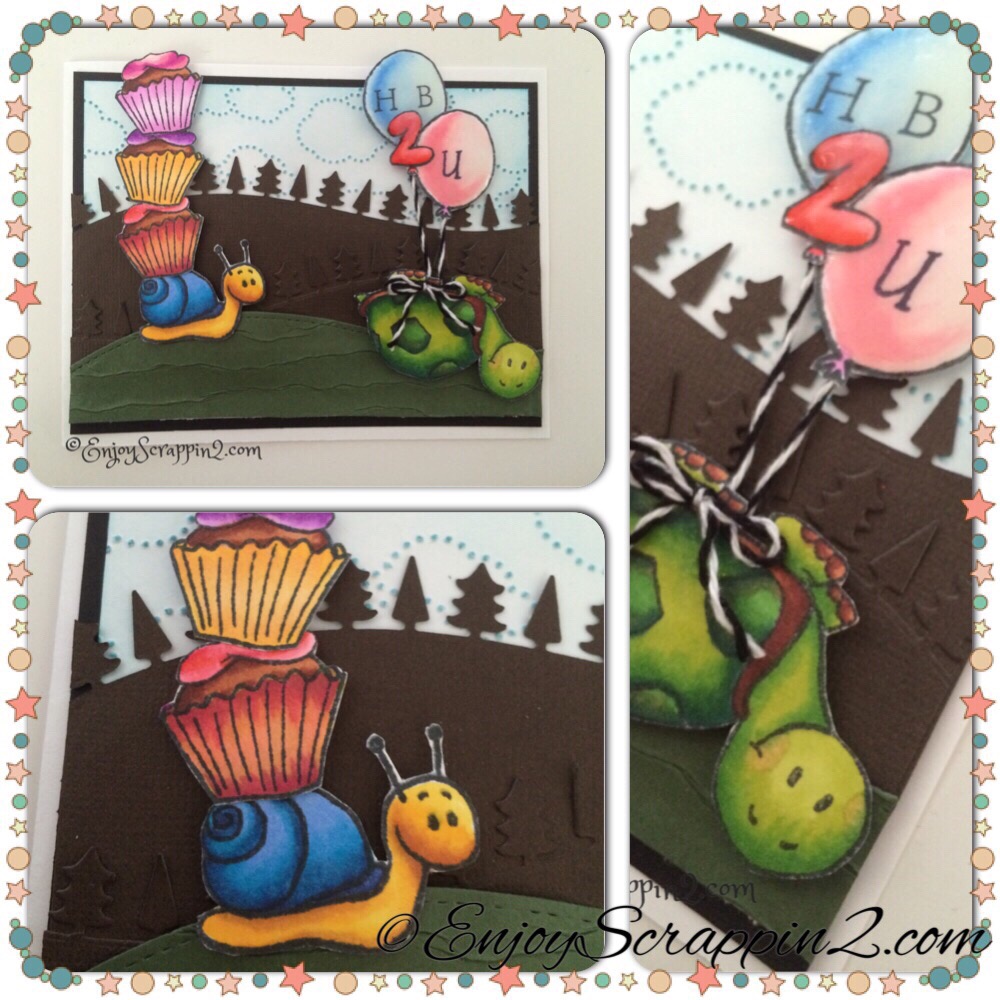
First off, these are Dye Based Ink pads! What that means is, the inks will be bright and vivid, giving a very crisp image. They dry really fast, because dye inks soak into the paper making the ink to dry faster. Most Stampers use more Dye base ink because of the properties I listed above. There are 12 Dye ink pads and 2 Pigment ink pads, which is Black and White. I have a video on my YouTube channel that explains in more detail of these ink pads if you’d like to check it out! I do demonstration of how they stamp and samples of All the colors.
Please check out http://www.tupelodesignsllc.com for these ink pads and more. I’ll put links below to make shopping easier for you but links be available in the afternoon. They have a variety of items available for variety of Crafters!! They have Super Fast shipping!! If you place an order in the morning, they will Ship it out That Day!! Otherwise, they’ll ship it out Next day!! That’s how fast they ship out your order. While your there, check out some of the other Crafty products they carry. Thank you so much for visiting and Please Subscribe for more inspirations and ideas. Thanks, Mahalo:)

http://www.enjoyscrappin2.com
Instagram,Twitter,Tumbler,Flickr,Bloglovin
@enjoyscrappin
#enjoyscrappin
FB: enjoyscrappin2

For One Stop Shopping and Super Fast Shipping visit
http://www.tupelodesignsllc.com

Balloon Shaker Card using Gerda Steiner Designs 3 Monsters

2015/02/img_7568.jpg

2015/02/img_7569.jpg

Aloha Guy!

Today I want to share this Balloon shaped card that’s also a Shaker card. I haven’t made a shaped card in a while so this was kind of fun. On top of that, I absolutely Love these Monster!!! This is a Digital image and the set has All 3 Monsters, I’ll leave a link below if you want to check it our.  First I made my Balloon Card base using Simon Says Stamp’s Balloon Die.  This die set has multiple sets of Balloons in it so the set is very versatile.  I then cut another balloon using the same size as my base for my card front, using watercolor paper.  I used that piece and cut out 3 circles using the SSS In Stitches circle die.  This has stitching on both the negative and the positive side so my circles that I cut has stitching on it, which is pretty cool.  I also used the same dies to cut myself an Acetate and some foam which I’ll use for the shaker portion.

I printed All 3 Monsters onto a Neenah Solar White paper and I couldn’t decide which one to use so I decided to used all 3.  I colored the monsters using my Copic markers.  I used the Inktense Pencils on the watercolor paper to add some color to the Balloon panel.  I used 3 different colors for the 3 circles and then used a brush and water to liquify the colors.  I tried to match the hole to the color of the monsters.  I then used the Peacock Feathers on the rest of the balloon. I attached the acetate to the front balloon and attached the foam.  In the circles I added some small seed beads, I didn’t add to much because I didn’t want to cover up the monsters.  I added some bakers twine bow at the knot of the balloon, and put a Happy Birthday sentiment.  I do have a Full Tutorial on how I made this card on my Youtube Channel, if you’d like to check that out.  Thank you so much for watching and Please subscribe for more inspirations and ideas.  Thanks again, Mahalo

http://www.enjoyscrappin2.com
https://www.youtube.com/channel/UCSmaap84Uvp7NPOcnJXGV9A
Instagram, Twitter, Tumbler, Flickr, Bloglovin
@enjoyscrappin2
#enjoyscrappin2
FB: http://www.facebook.com/profile.php?id=100006270948703

http://gerdasteinerdesigns.com

My First DT Project for TupeloDesignsLLC

2015/02/img_7626.jpg

2015/02/img_7627.jpg

Aloha Guys!

Today I’m sharing my First DT project fur TupeloDesignsLLC. I’m very excited for this opportunity and you’ll see a lot of projects for them in the future:)
Today I’m doing some Watercoloring using Koi Pocket Field Sketch Box with 24 colors. If you’ve been watching any watercolor tutorials on YouTube for cards, you probably have seen this watercolor set being used a lot. This watercolor set has a Very Intense pigment so it’s very easy to achieve colors on images fast. It’s conveniently packages with a water-brush for those on the go. I’m also using the Stampendous Large Butterflies Trio set and I’m using the largest one. I embossed it using Versamark with Hero Arts White embossing powder onto Tim Holtz Watercolor paper. Which is conveniently cut to a card size and I used my favorite Milwaukee heat gun to melt the powder. For the Watercolored butterflies, I worked on it section by section. I drop some clean water onto where I’m coloring and just dropped in the paint and let the water do all the coloring for me. The colors will only travel Only where the water is. I blended the Blue and the Purple which I think is a perfect combination. I then Splattered some paints using the same colors to give a unified look. For a Full Tutorial on how I made this card, please check out my YouTube channel, which will be listed below. I’ll also leave a supply lust below for your convenience. They also have FREE Shipping on purchases of $65 and over and they also have flat rates shippings depending on the amount you spend. They now have A Loyalty Program where you can accumulate points to spend on your next purchases. Joining is FREE and when you first join, you’ll automatically get 500 points and after that you get 2 point for each dollar you spend. I think that’s Awesome!!  They carry a variety of products for variety of crafters so go check them out. If you don’t see what your looking for, please email Mike and Mike’s email is always at the bottom of the website. They are always open to your suggestions!! Also please check out Jane’s Youtube Channel where she’ll do Product shares and some Amazing Mixed Media work. Thank you so much for visiting and please subscribe for more inspirations and ideas!! Thanks so much, Mahalo

http://www.enjoyscrappin2.com
https://www.youtube.com/channel/UCSmaap84Uvp7NPOcnJXGV9A
Instagram, Twitter, Tumbler, Flickr, Bloglovin
@enjoyscrappin2
#enjoyscrappin2
FB: http://www.facebook.com/profile.php?id=100006270948703

For Jane’s Youtube Channel:https://www.youtube.com/channel/UCF0JiXLBIhjbTs428xHWrMQ
For All Your Crafting Needs, visit
http://www.tupelodesignsllc.com

Gerda Steiner Designs-Late but with Love

2015/02/img_7617.jpg

Aloha Guys!

Today I’m sharing another card I made using Gerda Steiner Designs New Clear stamp set Late but with Love.  I really rally enjoy this stamp set because there’s so many different ways to use this stamp.  The versatilities are endless.  I Stamped out the images using Momento Tuxedo Black ink and colored all the images using my Copic Markers.  I cut out some brown card stock with the Lawn Fawn’s Tree border die and also cut my favorite green card stock with the Lawn Fawn’s stitched hillside border die.  I also embossed a white card stock using the Stampin Up’s clouds embossing folder (Retired) and distressed it with Peacock feather distress ink pad to bring out the embossed clouds.  I put all the components together and put glossy accents not the balloons for some finishing touch.  I do have a Full tutorial on how I made this card on my Youtube Channel if you’d like to check them out.  Thank you so much for visiting and please subscribe for more inspirations and ideas.  I’ll leave a link below for this stamp set and also the supplies I used of this card.  Thank you, Mahalo:)

http://youtu.be/LAxOmFaqBgY

https://www.youtube.com/channel/UCSmaap84Uvp7NPOcnJXGV9A
Instagram, Twitter, Tumbler, Flickr, Bloglovin
@enjoyscrappin2
#enjoyscrappin2
FB: http://www.facebook.com/profile.php?id=100006270948703

For More Adorable Digital, Rubber and Clear Stamps, please check out

http://gerdasteinerdesigns.com

For One Stop Shopping and Fast Shipping, please check out 

http://www.tupelodesignsllc.com

Happy Valentine’s Day with Mo’s Digital Pencil

2015/02/img_7581.jpg Aloha Guys!

Happy Valentine’s Day!!! Today I want to share with you guys this simple card I made using this Adorable image from Mo’s Digital Pencil’s image. This is a digital image from http://www.mosdigitalpencil.com. This image is only $1 for today and today only so go ahead and check this out if you’re interested in purchasing this image, I’ll leave a link below. After today, it’ll still be available but for a full price. I’ve always loved Mo’s images because they are super cute and this image kind of reminds me of my daughter:). Today I’m doing some quick coloring using my Copic Markers. I’ll list the full list of colors I used below along with the supply list.

I printed her out on Neenah Solar White Classic Crest card stock and cut her out using MFT’s Stitched rectangle die.  I used the largest size and I also cut out another card stock using the Mama Elephant’s Femme Frame die.  I’m also using the same patterned paper I had left over from making the Valentine’s goodie bag.  I have a Full tutorial on how I made this card on my Youtube Chanel if you’d like to check that out.  I thank you so much for visiting and please subscribe for more inspirations and ideas.  Have a Great Valentines Day:) Mahalo!

Skin: E21, E00, E000, R20 for blush

Hair: E55, E53, E51

Chocolate Heart: E59, E57, E55

http://www.enjoyscrappin2.com https://www.youtube.com/channel/UCSmaap84Uvp7NPOcnJXGInstagram, Twitter, Tumbler, Flickr, Bloglovin @enjoyscrappin2 #enjoyscrappin2 FB: Joyce Nakaoka

http://www.tupelodesignsllc.com

Gerda Steiner Designs February Challenge-Nerdy Bunny

2015/02/img_75621.jpg

2015/02/img_7563.jpg

Aloha Guy!

Today I’m sharing this card I made using Gerda Steiner Designs Nerdy Bunny for her progressive February Challenge. I Adore this Bunny!! He is super cute!!  She has a Progressive Challenge where you purchase her stamp set and use it for her monthly Challenge.  Next month, she’ll send you a FREE image to participate in another challenge.  It’s on going.  As long as you participate, you’ll get a Free image every month.  It’s a Great way to collect all different types of images.  For this month, she sent this Nerdy Bunny and I made a Spring card instead of an Easter card.  I don’t make too many Holiday cards since I can only use it for that particular Holiday.  So I try to make a general card that I can use all year long.  This bunny is not a Easter bunny so I can use him all year long.

I cut out a stitched rectangle and embossed a sun beam on the top right corner using Stampin Up’s Kinda Eclectic Stamp set.  I love this set as well:P  I embossed it with white embossing powder and when I distressed the sky using Peacock feathers distress ink, the white sum beam shows through.  I colored the bunny using my Inktense pencils and liquify the pencils using a tiny brush and a little bit of water.  I cut out the bunny’s glasses separately and after coloring, I used the clear ultra thick embossing powder and embossed over and over until I got he dimension I wanted.  I cut some grass using the Lawn Fawn’s glass border die and put together this card.  I used the basket from another Gerda’s digital image, which is Easter bunny in Basket and just used the basket portion.  I have a Full tutorial on how I made this card on my youtube channel if you’d like to check it out.  I’ll leave a link below if you want to check out these digital stamps.  Thank you so much for visiting and Please subscribe for more inspirations and ideas.  Much Mahalo:)

http://www.enjoyscrappin2.com
https://www.youtube.com/channel/UCSmaap84Uvp7NPOcnJXGV9A
Instagram, Twitter, Tumbler, Flickr, Bloglovin
@enjoyscrappin2
#enjoyscrappin2
FB: Joyce Nakaoka

SSS Wednesday Challenge-All things Bright and Beautiful

wednesdayblog-logo2015/02/img_7580.jpg

Aloha Guys!

This is a card I made for the SSS Wednesday Challenge All things Bright and Beautiful Hosted by Hero Arts. This stamp set I used here is one of my Favorite stamp set from Hero Arts. I used watercolor paints and made it really Bold and Bright. The colors were so beautiful that I decided to not cover up the front panel of this card. I just added a black card stock behind it, just to accent the panel. I hope you like the colors and please subscribe for more inspirations and ideas. Thanks again, Much Mahalo:)

http://www.enjoyscrappin2.com
https://www.youtube.com/channel/UCSmaap84Uvp7NPOcnJXGV9A
Instagram, Twitter, Tumbler, Flickr, Bloglovin
@enjoyscrappin2
#enjoyscrappin2
FB: Joyce Nakaoka

Lawnscaping Challenge and Markerpop Challenge #62

10524632_10205212995710295_591438488004373473_nUntitled

2015/02/img_7578.jpg

2015/02/img_7579.jpg</a

Aloha Guys!

Today I’m sharing this card I made for the Lawnscaping Challenge which is to make a Clean and Simple card.  This Challenge ends in a couple of days.  I made this simple card using the Lawn fawns You Color my World stamp set which was a special for Black Friday.  I absolutely love this crayons.  It’s so versatile in so many ways.  I cut out a rectangle using the Lawn Fawn’s Stitched rectangle die and I used the Stampin Up’s Work of art stamp set to create like a crayon sketch.  I stamped out 3 crayons using momento tuxedo black ink and I colored them using my Copic Markers.  I stamped out the sentiment using the Versafine Onyx Black ink and embossed it using Clear Embossing powder.  I then attached the crayons onto the matching color sketch that I stamped out using Stampin Ups ink pads.  So simple and fun.  I didn’t add any color to the Stitched rectangle and left it White on White.  I love the way it turned out. I’ll be making few more of these for the OWH Cards.  I’m busy making cards for it to meet the Easter Deadline.  I’ll be sharing some of the cards I made for it a little later:).  Thank you so much for visiting and please subscribe for more inspirations and ideas.  I will have a Full Tutorial on how I made this card on my Youtube channel real soon.  Thank you and Much Mahalo:)

http://www.enjoyscrappin2.com

https://www.youtube.com/channel/UCSmaap84Uvp7NPOcnJXGV9A

Instagram, Twitter, Tumbler, Flickr, Bloglovin

@enjoyscrappin2

#enjoyscrappin2

FB: Joyce Nakaoka

Card From the Heart Card Drive 2015

Error
This video doesn’t exist

Aloha Guys!

Today I’m sharing some cards I made for the Card from the Heart Card Drive for 2015.  Because I found out about this too late, I didn’t get to make as much cards as I wanted.  I will be mailing this out tomorrow since it takes longer time to get there from Hawaii.  I’ll be more prepared for this Next year for sure.  Thank you so much for visiting and please subscribe for more inspirations and ideas.  Much Mahalo:)

For more information on Card From the Heart Card Drive, Please visit the link below

http://winterwonderlandcrafter.blogspot.com/2015/01/cards-from-heart-card-drive-2015.html

“Cards From the Heart Card Drive” 2015

2015 banner

Aloha Guys!

I just found out about this Valentines Day Card Drive that sends out these cards to different Hospitals and Foster homes for the Kids.  This is such a Incredible opportunity to put a smile on their faces.   I’m just bumped out that I didn’t find this sooner, then I would of been able to send out more cards.  But I guess Some is Better than None.  I’ll be sending out all the Valentine theme cards for this drive and Next year, i’ll definitely be more prepared.  If you are interested in participating for this drive, I’ll leave a link below so you can get more information about it.  Thank you guys so much for visiting and Please subscribe for more inspirations and ideas.  Much Mahalo

Please Check out my Youtube Channel for more card making tutorials.

https://www.youtube.com/channel/UCSmaap84Uvp7NPOcnJXG

http://winterwonderlandcrafter.blogspot.com/2015/01/cards-from-heart-card-drive-2015.htmlV9Ahttps://www.youtube.com/channel/UCSmaap84Uvp7NPOcnJXGV9AAloA