Tiddly Ink Challenge #143-Use Non Halloween colors

IMG_7200.JPG

IMG_7202.JPG

TIDDLYCHALLENGEBUTTONSQ

Aloha Guys!

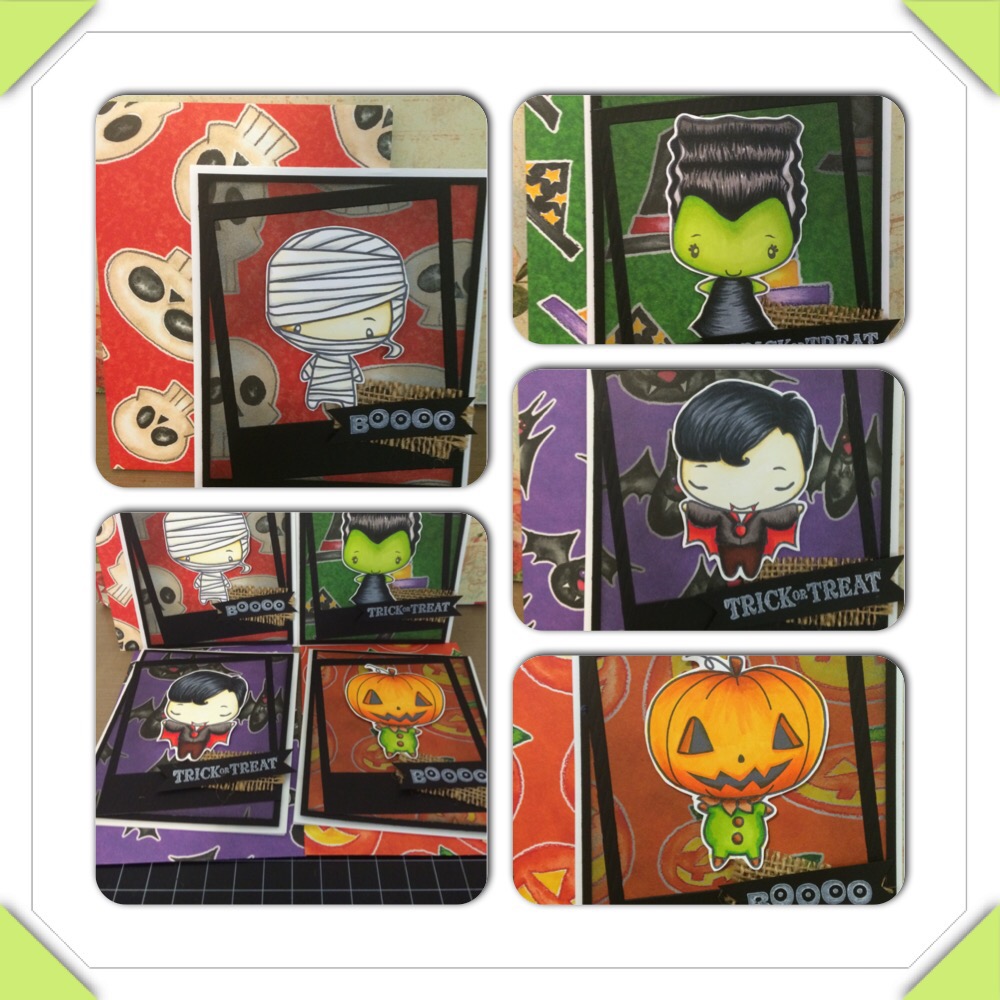
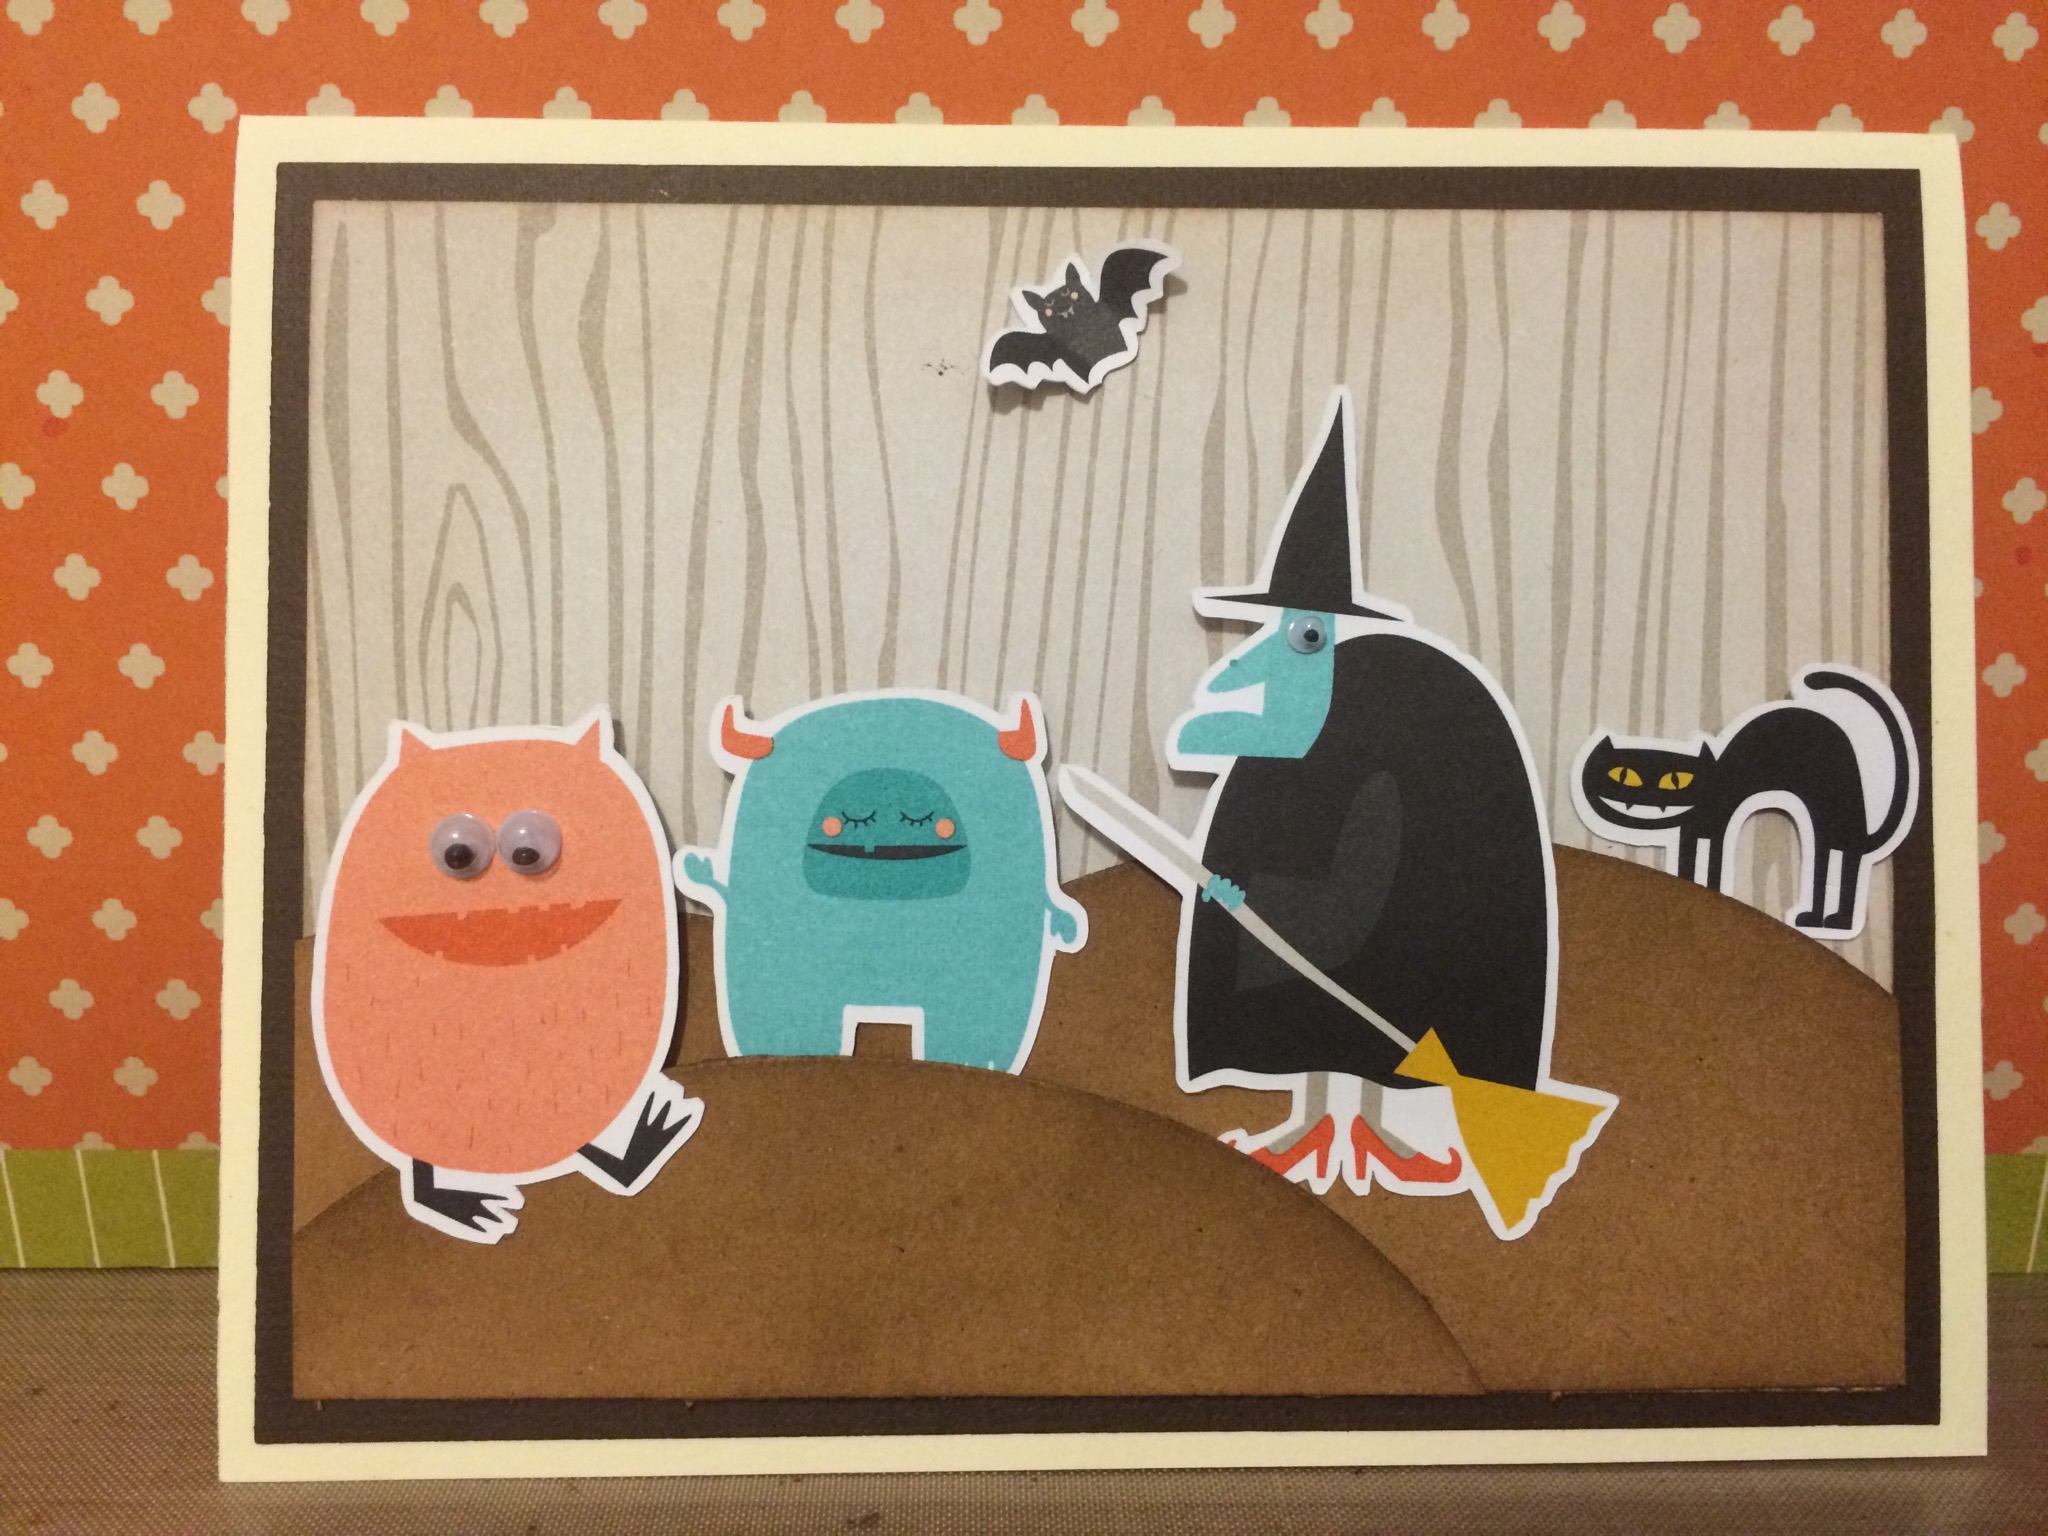
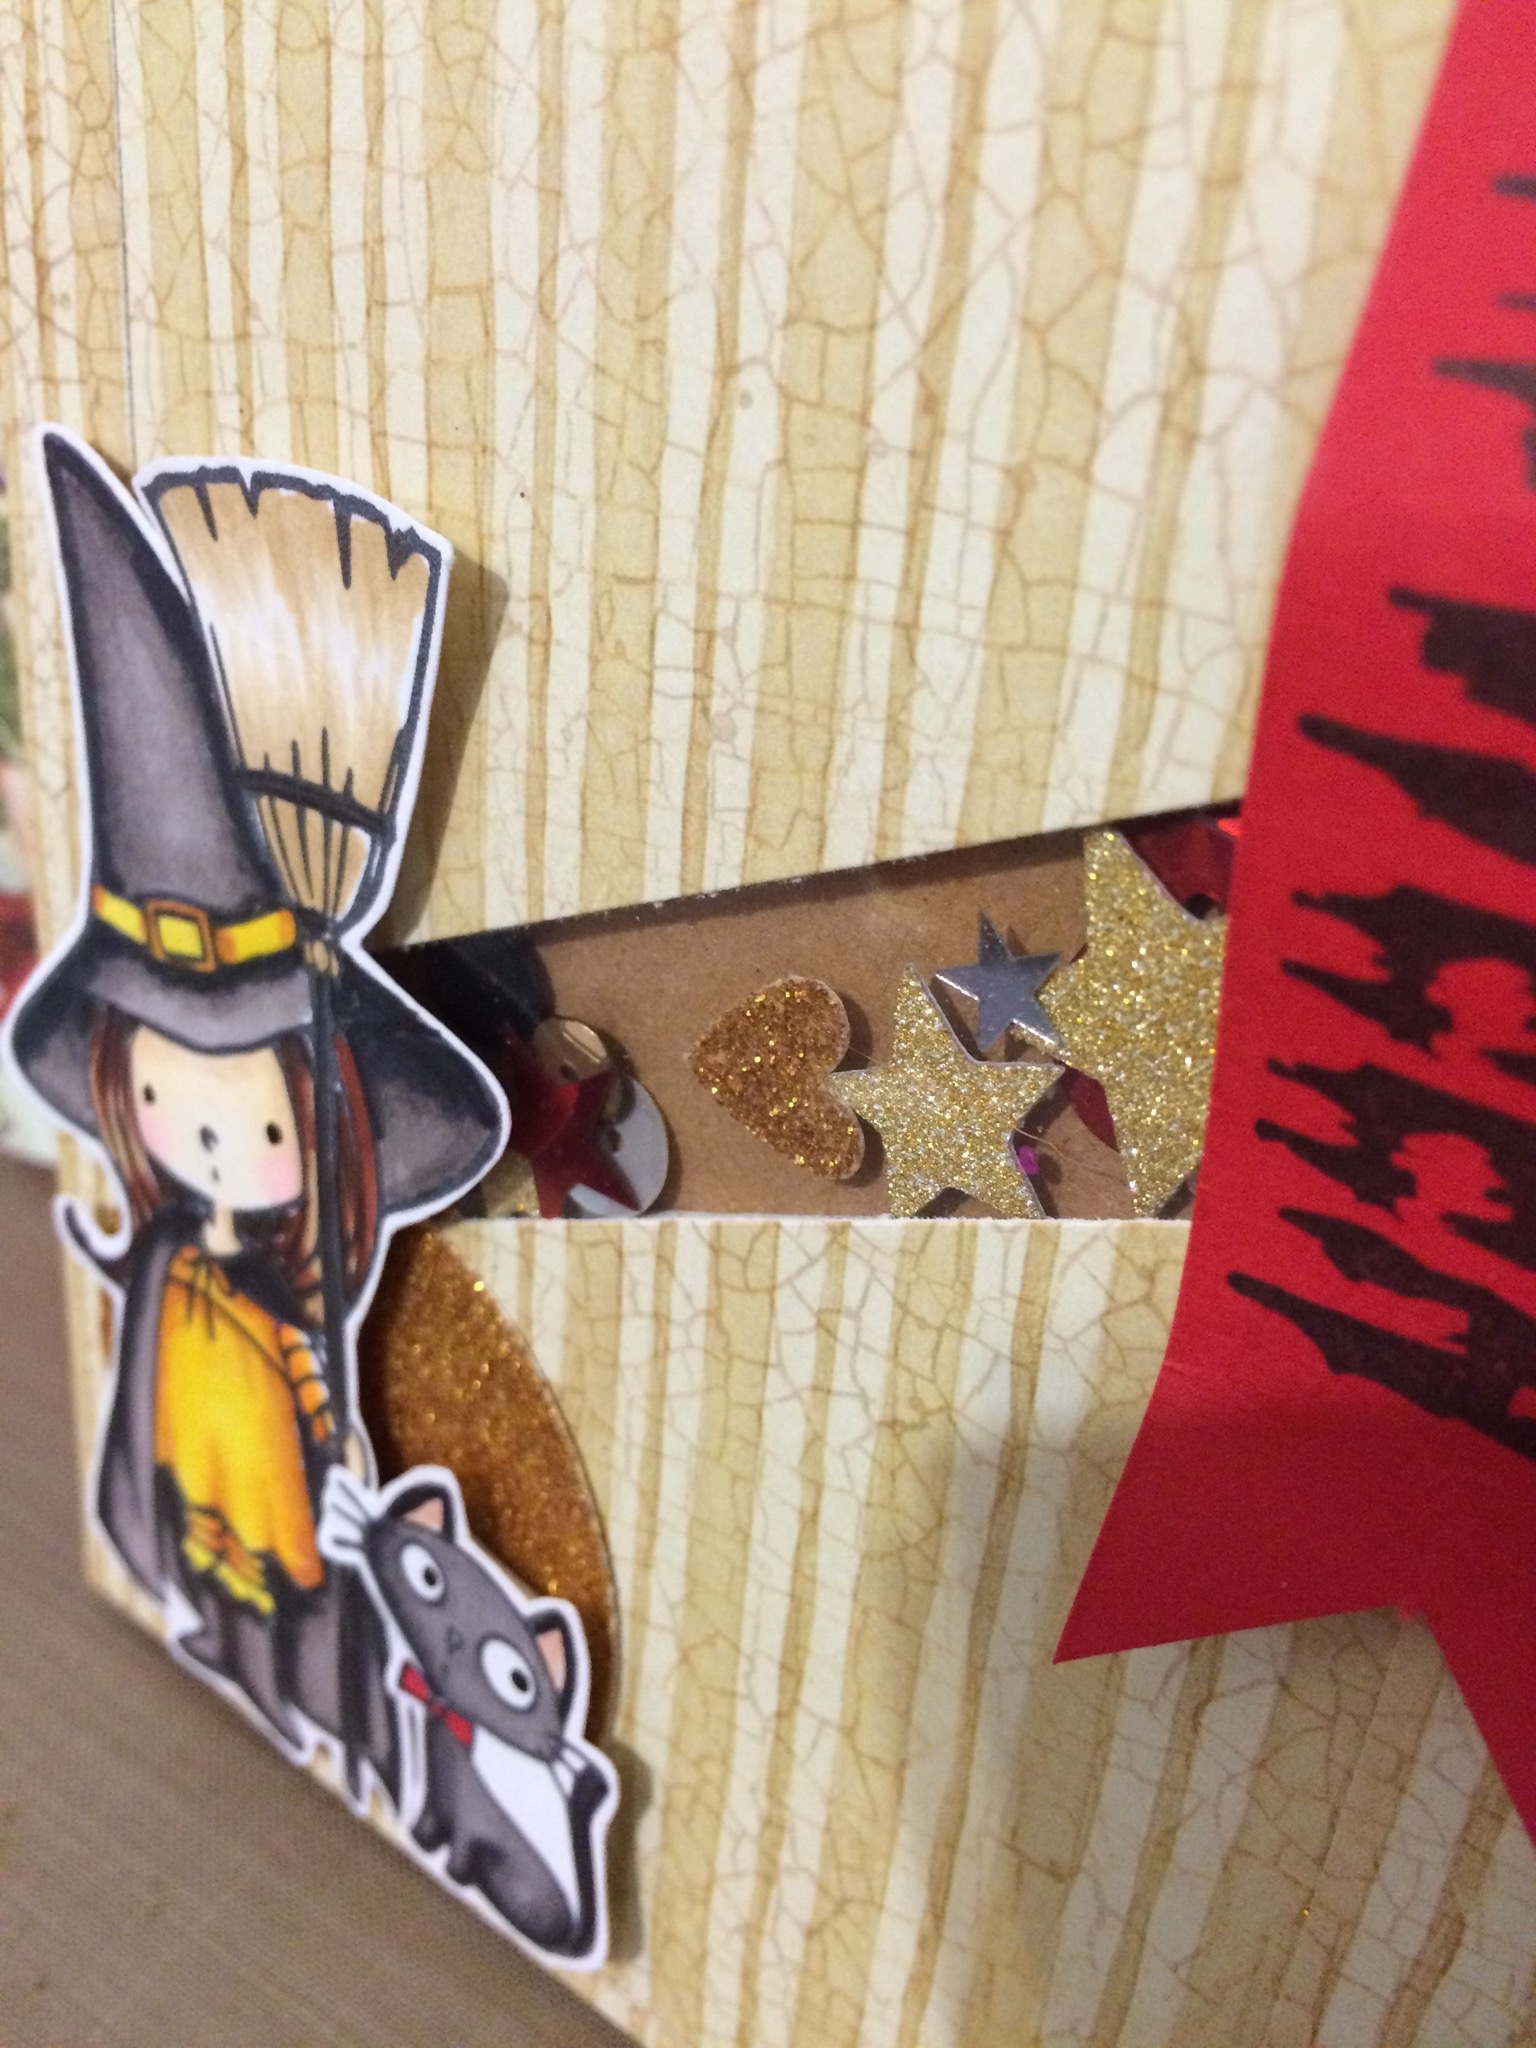
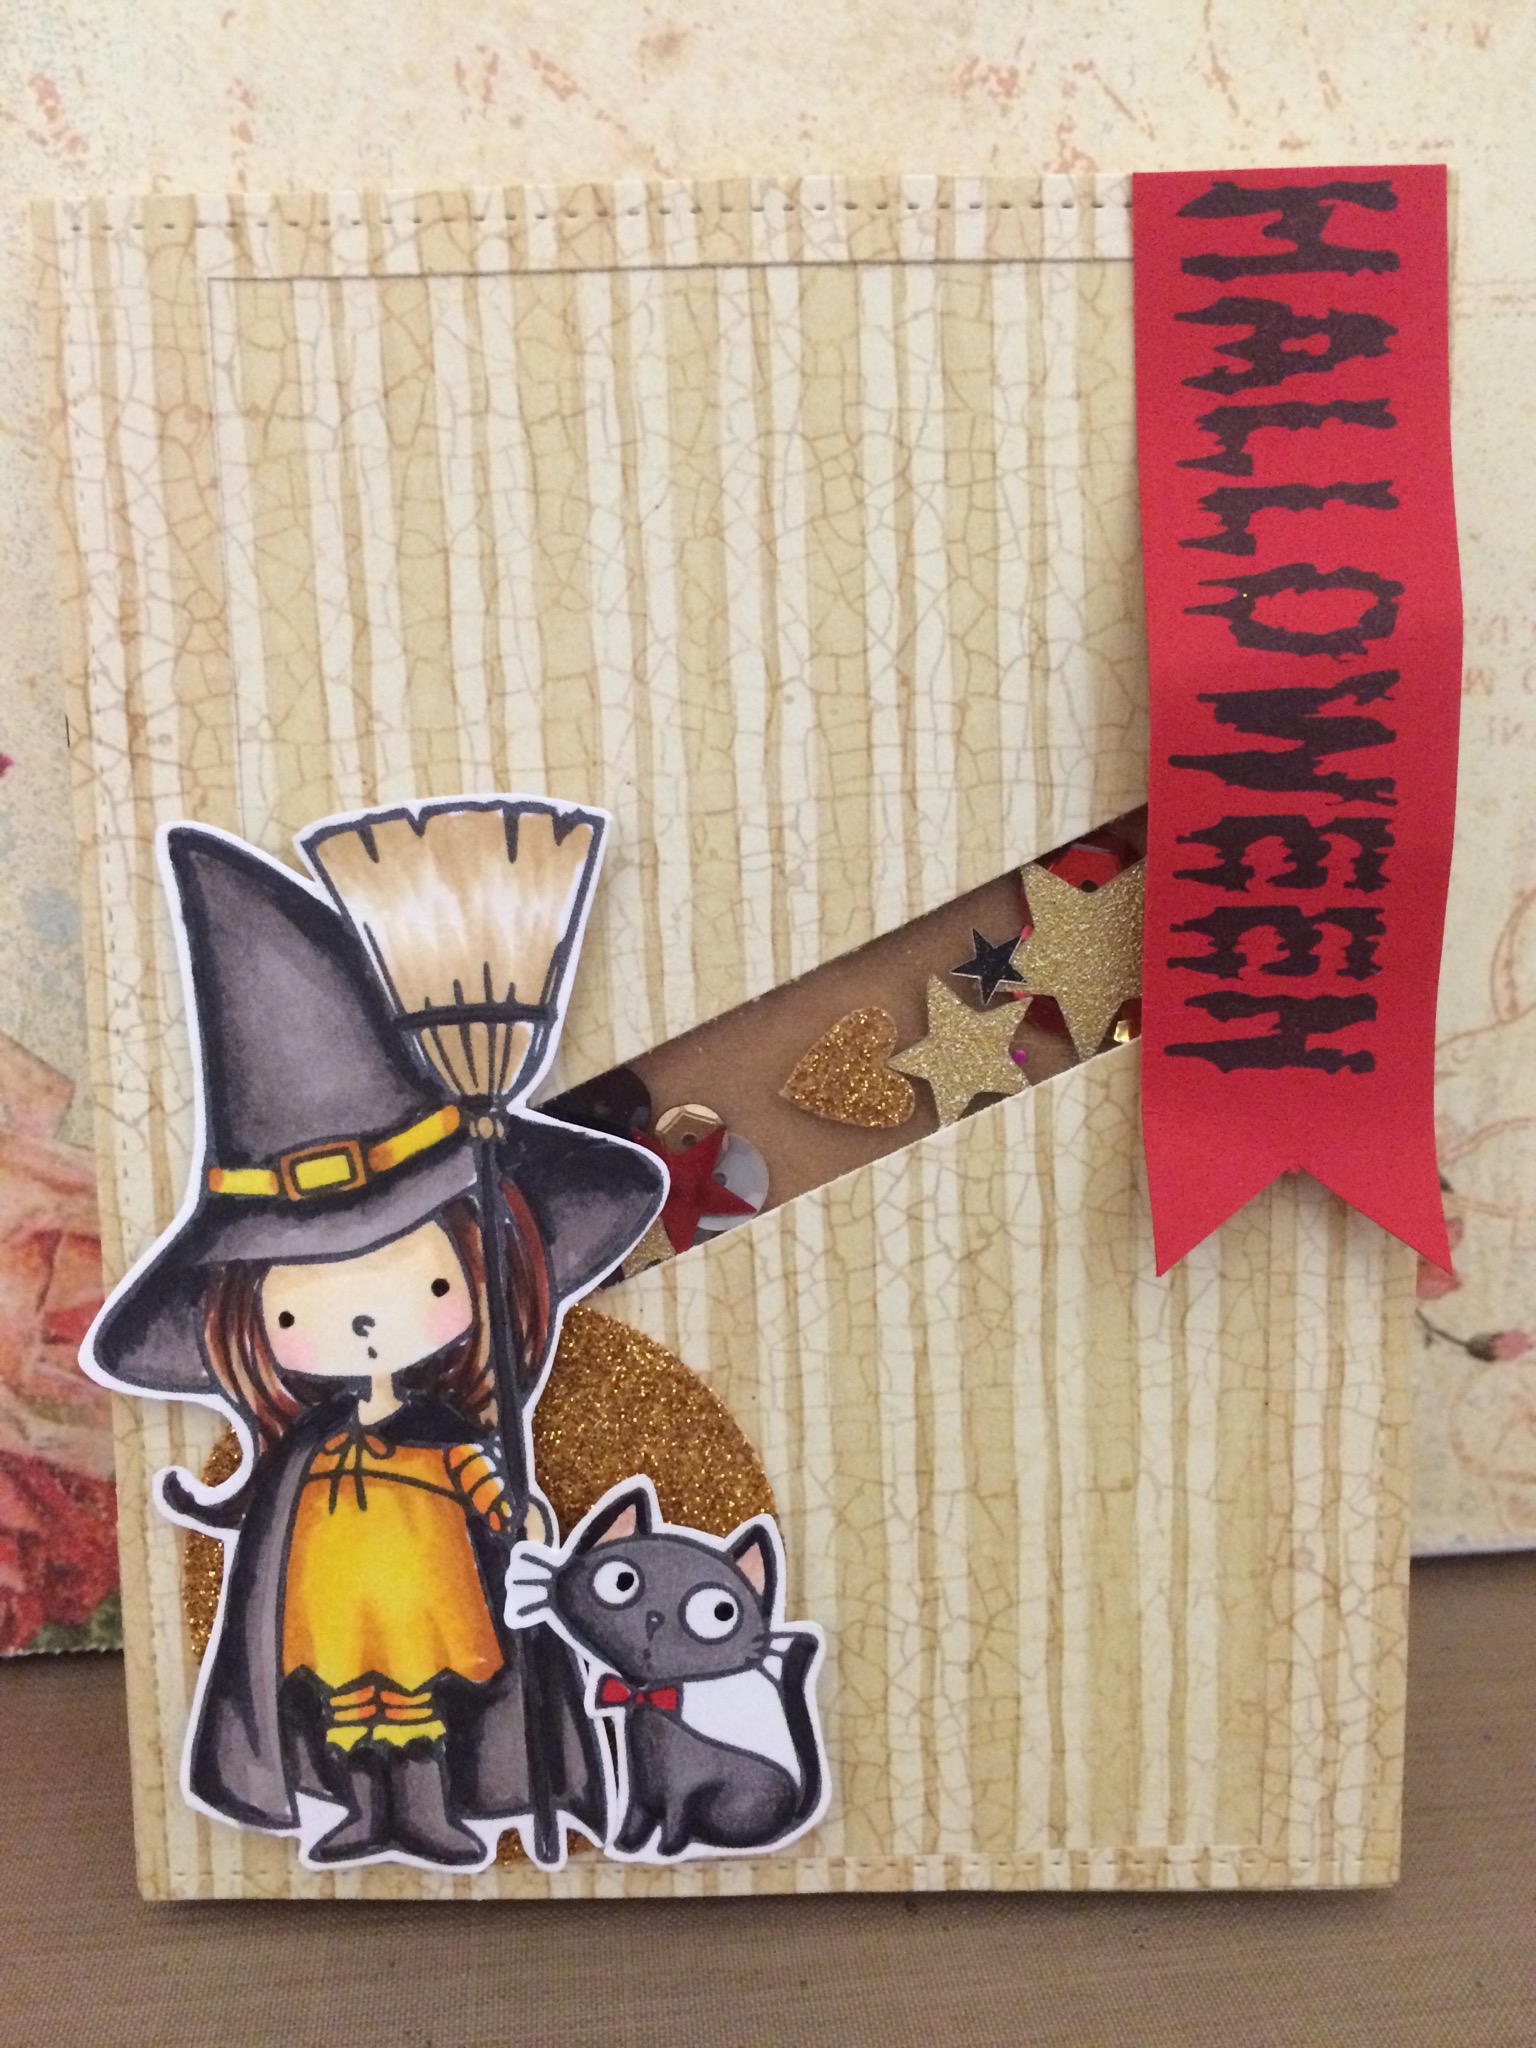
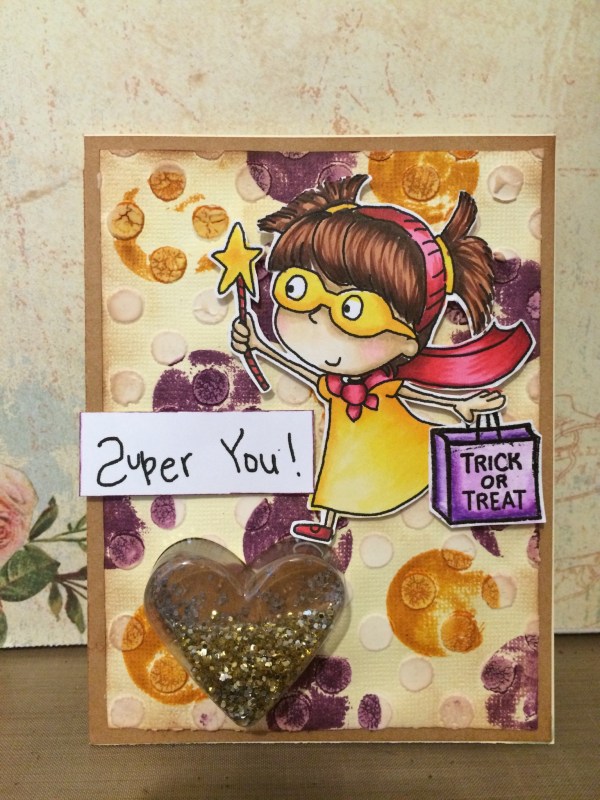
Today I’m sharing a card I made for the Tiddly Ink’s Challenge #143.  The Challenge was to use a Non Traditional Halloween Colors.  I purchased this super cute image which was called Avenger-Masked Hero because it reminded me of my daughter.  She’s the Pink Power Ranger this year so I’d thought this image would be perfect for this challenge.  The image came with 3 different sentiments and some of the letters are flipped and backwards, exactly like my daughters writing.  I colored this image using my Copic and my Shinhan touch brush markers and  I made a shaker card but I cheated a little by using this Heart shaped cup.  This is an old stampin up product that they had where you can out candys inside these cups on the card.  They no longer sell the heart shaped ones but they still sell the circles.  All you have to do is punch a hole same shape as your cup and out the paper with the hole on top of the cup.  It has a self adhesive which make it even easier.  I used this as my shaker portion and filled it with some gold and silver chunky glitter.  For the top layer of the card, I put on some textured paste with my polka dot stencil and let it dry and used this round foam pods and added some color using seedless preserve and wild honey distress inks.  I them placed that on a 4 1/4″x5 1/2′ Kraft card stock and attached the whole thing on an A2 size very vanilla card base.  Of course I had to use one of the sentiment’s from this set and I chose Super You!  I also gave her a Trick or Treat bag which is from the Lawn Fawn Critter’s in Costume set.  That finishes my card, and I all have a full tutorial for this card on my Youtube Channel as soon as I edit it.  Thank you so much for visiting and please subscribe for more inspirations and ideas.

Much Mahalo,

http://www.enjoyscrappin2.com
Youtube: http://youtube.com/channel/UCSmaap84Uvp7NPOcnJXGV9A
Instagram, Twitter, Flickr, Bloglovin
@enjoyscrappin2
#enjoyscrappin2

SSS Challenge and Alte New Challenge in One

IMG_7193.JPG

IMG_7191.JPG

IMG_7199-0.JPG

Aloha Guys!
Today I’m sharing these cards I made for Simon Says Challenge and also for Alte New October challenge. Simons challenge was to create with Kraft and Alte New was Chocolate. So…I decided to combine the two and make a card. I had several ideas in my head on what look I wanted to go for but I couldn’t decide which one I wanted to make sooo I decided to make both and see what happens. I stamped out the Alte New Hennah Elements stamp on some Neenah Dessert Storm card stock with MFT Kraft ink. By the way I Love these MFT ‘s Hybrid ink pads, Awesome!! Anyways, on 1 card I colored it using my Shinhan touch alcohol markers and the other one I just sketched it with colored pencil. I didn’t want a colored look for the pencils, I wanted it to look like I sketched it. Same stamped image with two different looks! I still can’t decide what I like better. What do you guys think? Leave me a comment on which one you like better. Thanks for stopping by and please subscribe for more inspirations and ideas. I’ll have a full tutorial for this card on my YouTube channel if you’d like to check that out.

Much Mahalo
Joyce

http://www.enjoyscrappin2.com
Youtube: http://youtube.com/channel/UCSmaap84Uvp7NPOcnJXGV9A
Instagram, Twitter, Flickr, Bloglovin
@enjoyscrappin2
#enjoyscrappin2

My Cards were Featured on TGF Wow’d Me Wednesday! Yay!!

Aloha Guys!

I just wanted to share with you that my card set with matching envelopes using TGF Spooktacular was featured on their Wow’d Me Wednesday!  I was super thrilled and Honored for my cards to be on their Blog!  Thank you so much to everyone and I just wanted to share this wonderful news!  Thanks again.  If you guys want to check it out here is the link!

http://thegreetingfarm.com/blog/?p=2350

IMG_7129

This was the Set that I Made.  Thanks

Much Mahalo

Joyce

Gerda Steiner Designs October Challenge-Rainy Days

IMG_7171.JPG

IMG_7170.JPG

IMG_7169.JPG

Aloha guy!

Today I wanted to share with you this card I made for the Gerda Steiner Designs October Challenge. The challenge is to use this super cute image called Rainy Days. You can purchase this from http://www.gerdasteinerdesigns.com. This image was a digital image that I got Free for participating in the last months challenge. When you participate, shes’ll give you a Free image the following month so you can join in again. That’s pretty cool! Anyways, I decided that I wanted to paper piece the umbrella so since this was a digital image, I just printed multiples on design papers to see what liked the best. I decided to use this super cute Hello Kitty paper so it can be a hello kitty umbrella. My daughter loves hello kitty so I had some hello kitty design papers on hand. The rest of the image, I closed using both my Copics and my Shinhan touch markers. Pretty simple card today and I hope you liked it. I have a full tutorial for this card on my YouTube channel if you’d like to check that out. Please subscribe for more inspirations and ideas! Thanks so much

Much Mahalo:)

http://www.enjoyscrappin2.com
Youtube: http://youtube.com/channel/UCSmaap84Uvp7NPOcnJXGV9A
Instagram, Twitter, Flickr, Bloglovin
@enjoyscrappin2
#enjoyscrappin2

I was Chosen for the Newton’s Inky Paws challenge for September!! Yay

I was Top Pick!!

I was Top Pick!!

Aloha Guys!

I think I forgot to share with you guys that I was One of the Top Picks for the Newton’s Inky Paw challenge for September!!  Yay!!  They chose 2 winners and I was one of them:)   I was Super Excited when I found out that I basically jumped for joy, literally, lol.  This was the card that I entered and I am very Thankful and Honored to be chosen amongst all the fabulous entries!  Thank you so much!! I This was super Big deal for me and I thought I’d share it with you guys!  Thanks for stopping by and Much Mahalo!!

Joyce

This was my card

  This was my card

Stampin Up-Quick and Easy card, No Stamping

IMG_7138.JPG

Aloha Guys!
Today I’m making a super simple card using just some few products. I’m using the Stampin up’s Montly monsters DSP. I used my Scan N Cut to cut some of the adorable characters that’s on one of the design paper. I also cut out couple ovals with Kraft cardstock using Stampin up’s ovals Framelits but you can definitely cut it out using your scissors. My card base is a regular A2 size very vanilla. I also have a black card stock 4″x5 1/4″ and I cut the Woodgrain paper at 3 3/4″x5″. The ovals I cut out with Kraft cardstock, I’ll be using it for my hills so I trimmed them down and distressed it with walnut stain. I attached all the components together and put a witch and several monsters on top of the scene I created. For a full tutorial for this card please visit my YouTube channel. Thanks so much for visiting and please subscribe for more inspirations and ideas! Thanks

Much Mahalo:)

https://www.youtube.com/channel/UCSmaap84Uvp7NPOcnJXGV9A
https://www.facebook.com/enjoyscrappin2
Instagram, Twitter, Flicker and bloglovin
@enjoyscrappin2

Lawnscaping FB Inspiration Design Team Call

10474739_10204890329643845_4330031298596047046_nIMG_7176.JPG

IMG_7177.JPG

IMG_7175.JPG

Aloha Guys!

Today I’m also sharing this card I made to participate for the Lawnscaping FB Design Team Call.  I am really excited about this since I Love Lawn Fawn and I use their stamps all the time so this is a perfect opportunity to be a part of this Great DT.  I first stamped out all the images I wanted to use that will be on top of this ice I created.  I stamped out 2 Seals and the ice burg from the Critters in the Arctic set using MFT Black licorice ink and colored them using Cool Gray Copic Markers.  I used C9, C7,C5 and C3 for the seals and used a super light blue and blended the ice burg with the colorless bleeder just to give a slight color.  I embossed the iceberg with Tsukino’s iridescent embossing powder to give some shine.  I then placed both the seal on top of the ice and used an acetate to stamp out the reflection of th 2 seals together.  I colored the reflection using slightly lighter with C7,C5,C3.  I put a post it note across where I wanted the ice and also stamped out the trees using Joy to the Woods stamp set and also stamped out the reflection using the same acetate method.  I kept the post it notes straight across to make the ice portion and used distressed inks Tumble glass, and ice spruce and also embossed it using the iridescent embossing powder to also give shimmer of the ice.  This is after I colored all the reflections.  I put the post it note on the other side to create the sky portion using Tumble glass, Broken china, Chipped sapphire and ice spruce.  I stamped out little snow flakes and embossed it with white embossing powder so it’ll resist the colors to show the snow flakes.  I stamped the sentiment from Joy to the Woods on some vellum and used rangers liquid platinum to emboss and tucked one side under all the card layer and put glue dots on the red heart I stamped out after the greeting.  I used sakura’s gel pen to highlight the seal’s nose and ice as well as using some white uniball gel pen to highlight title parts of the iceThis finishes my card today for this challenge and I loved creating this snowy scene.  Thanks for visiting and Please subscribe for more inspirations and ideas!

http://www.enjoyscrappin2.com
https://www.youtube.com/channel/UCSmaap84Uvp7NPOcnJXGV9A
https://www.facebook.com/enjoyscrappin2
Instagram, Twitter, Flicker and bloglovin
@enjoyscrappin2

Paper Smooches Sparks Challenge

IMG_7174.JPG

IMG_7172.JPG

IMG_7173.JPG

Aloha Guys!

Today I’m sharing a card I made for the Paper Smooches Sparks challenge for October. I stamped out the flower images from the Blossom Buds on Kraft paper. I colored them using Faber Castell metallic pencils. At first I was going to put vellum over it to give more of a subtle look but I realized that all the metallic shimmer will disappear and get covered up with vellum. I decided to cut out 4 very vanilla frames using Lawn Fawn’s Stitched large rectangle die and embossed the frame using my Stampin up’s Woodgrain embossing folder to give some texture.  I also distressed it as well so the woodgrain will give more dimension.  I also cut out an acetate and attached it in between the frames so it’s 4 frames and the acetate.  This will be a shaker part of the card.  I attached the Foam adhesive all around the frame covering the entire frame.  I them put some of the shinny confetti’s and some seed beads that coordinated with the flower colors.  I attached this to my card panel and that completes my card for the Paper Smooches Sparks challenge!  Thanks for visiting and please check out my youtube channel for tutorial for this card.  Thanks again and please subscribe for more inspirations and ideas.

SPARKS BADGE

http://www.enjoyscrappin2.com
https://www.youtube.com/channel/UCSmaap84Uvp7NPOcnJXGV9A
https://www.facebook.com/enjoyscrappin2
Instagram, Twitter, Flicker and bloglovin
@enjoyscrappin2

MFT Sketch challenge #198

PrintIMG_7168-0.JPG

IMG_7167-0.JPG Aloha Guys! Today I’m sharing this card I made for MFT Sketch Challenge #198. I made this into kind of like a shaker card but only the center strip. I love shaker cards but it’s always a challenge for me with each different shaker. I kind of struggle with it but I’m determined to make it work, lol. I stamped and copic colored the images from Witch is the way set and I cut out the rectangle with the Lawn Fawn’s Stitched rectangle and cut the center strip diagonally and made that into a shaker card. The design paper I used for this card is from K&Co but I’m not sure witch pack it came from. Overall, I think this turned out ok. I don’t really like the placement on the banner with the sentiment either but it’ll have to do. I hope you guys like this card and please subscribe and press the like button so I’ll know you liked it. I also create a New Page on my FB so I hope you’ll go check that out. I’m not very familiar with all of these social network type of thing but I’m trying my best to keep up with the “Trend”, lol. I also will have a full tutorial for you on how to make this card on my YouTube channel once I’m done editing. Thanks so much for stopping by and have a great day Much Mahalo Joyce http://www.enjoyscrappin2.com https://www.youtube.com/channel/UCSmaap84Uvp7NPOcnJXGV9A https://www.facebook.com/enjoyscrappin2 Instagram, Twitter, Flicker and bloglovin @enjoyscrappin2

Watercolor with INktense Pencils on Mo Manning’s Bossy

Aloha Guy!

Today I have as short video for you on How I watercolored this Mo Manning’s Digital image, Bossy using my Inktense Pencils.  I felt like like just coloring so I just grabbed my intense pencils and one of the many digital images I have printed and started coloring.  This is a very easy way to watercolor and these pencils are the key, in my opinion.  I love watercoloring and I hope you guys enjoy this short video and try them out for yourselves.  Thank you so much for visiting and pleased subscribe for more inspirations and ideas.  Please check out my other videos on my Youtube channel.  Thanks so much

Please Check out my Youtube Channel:https://www.youtube.com/channel/UCSmaap84Uvp7NPOcnJXGV9A

Instagram, Twitter Flickr and Bloglovin:

@enjoyscrappin2

#enjoyscrappin2