How to Create your Own Background Paper-Gerda Steiner Designs

IMG_9195

IMG_9196

IMG_9198

IMG_9197

Aloha Guys!

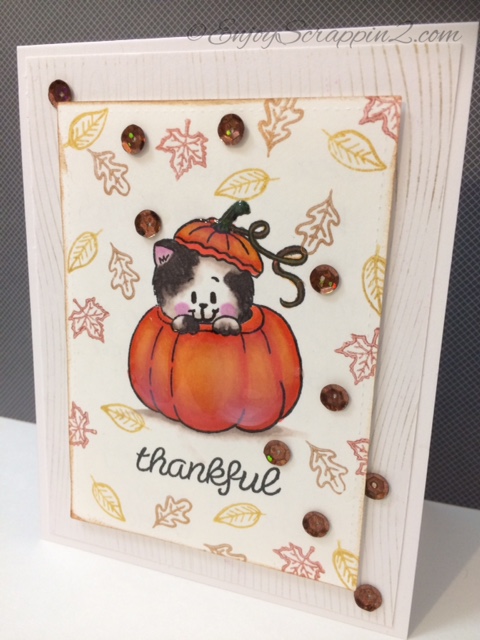
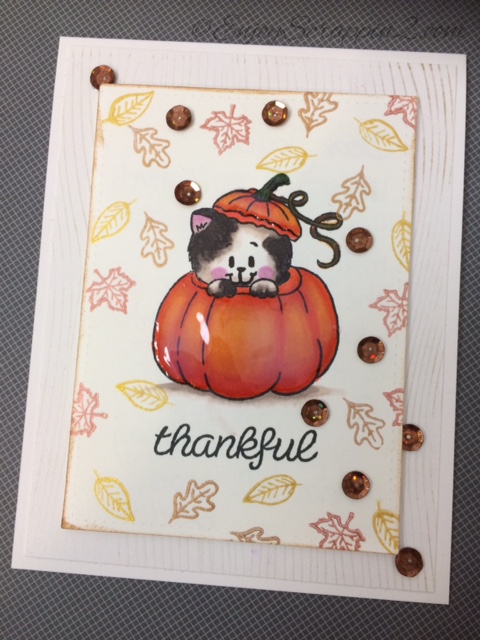
Today I’m making a Clean and Simple card using this stamp set, Peekin Pumpkin Kitten along with the Happy Fall set.  I won’t be showing the coloring portion of this pumpkin but I’ll definitely show it, next time I use this stamp set for Halloween.  I just love the versatility of Gerda’s stamp sets.   I will be creating my own background paper just by using some small stamps from the Happy Fall set.  I hope you like this card and please subscribe and follow for more inspirations and ideas.  Also check out Gerda’s blog, where you can see more inspirations from the Design team 🙂  Thanks again!

Please Follow me on my Social Mdias

http://gerdasteinerdesigns.com

http://static.inlinkz.com/ppr.js

Gelatos Background and Quick Copic Coloring Tupelo Deisgns LLC

IMG_8852

IMG_8854

IMG_8853

Aloha Guys!

Today I’m making a DT card for Tupelo Designs LLC.  The stamp set I’ll be using is MFT’s I Knead You stamp set, which consists of kittens/cat images and accessories to go along with it.  This stamp set is really good because you get a a lot of stamps for your money, which is a plus.  I’m also using some Gold and Silver Gelatos to make my own shimmery background.  I purchased the Metallic 15 piece set from them not too while back and since then I’ve only used them once so I decided to use them to make my background.  I already had some collections which I purchased long ago so these gelatos last very long and they have released different sets, which will make collecting easier.  I dry embossed a card stock using one of the embossing folders I had.  I then applied the gelatos on the embossed paper, which will only get color on the embossed/raised area, but I wanted more of a blended look, I blended it out using some semi-dried baby wipe.  These gelatos are water soluable so you can easily watercolor using them.

I cut out a circle, using the MFT’s stitched circle die and stamped out my kitty of my choice onto this Neenah solar white card stock.  I then did some simple Copic coloring and assembled the card together.  For a full step by step, please check out the video which is located up above.  I hope you like this card and please subscribe and follow for more inspirations and ideas.  Thanks so much 🙂

http://static.inlinkz.com/ppr.js

Copic Coloring Using Wplus9 Stamp-Tupelo Designs LLC

IMG_8782

IMG_8783

IMG_8784

Aloha Guys!

Happy Monday, and it’s time for a DT Card for Tupelo Designs LLC.   Stamps set I’ll be using is the Wplus9 Flora Fauna 1 along with my Copic markers.  I’ve mentioned before that Tupelo Designs LC is now carrying Copic markers so I’m super excited!!  I went ahead and stamped out this dogwood flower onto my Neenah Solar White using My favorite things Hybrid licorice black ink.  You can use this ink for alcohol markers and watercolor so it’s a great ink pad to have.  Wplus9 is one of the New collections they are carrying but they are constantly adding more brands all the time.

I made this card simple but I think, the flower really pops and I really like that.  I have a full tutorial up above if you want to see the whole process.  I thank you guys so much for stopping by and please subscribe an follow for more inspirations and ideas.  Thanks again.  Mahalo 🙂

Copic colors I used: RV09, RV04, RV23, R32, G28,G07, YG45, Y38, Y17

CAS Card Using Bird Crazy and Copic Markers-Tupelo Designs LLC

IMG_8696

IMG_8698

IMG_8697

Aloha Guys!

Today I’m making a very Clean and Simple DT Card for Tupelo Designs LLC using this Bird Crazy stamp set and some Copic Markers.  I’m Super excited to share with you guys that Tupelo Designs LLC is now carrying Copic markers!! Yay!!  I decided to make this card really simple because I wanted to go over some things regarding Copic Markers.  You can get a full step by step on how I made this card by watching the video link up above.

I wanted to go over some general information regarding these markers that might be handy to know.  First off, you can keep track of your copic markers by downloading a Free Color chart from copicmarker.com and I’ll leave a link below or you can even purchase this Hex Chart from Sandy Allnock’s website for several dollars, which is a handy tool as well.  She designed this chart to help us have an easier time finding the right color combinations that go well together and I think this chart is very helpful.  The copic markers have a different numbering system that you should know in order to choose the right combinations.  You can also get more detail information in this on the copic website as well.

These markers are alcohol base markers and with alcohol based markers, it’s very important to use the right ink that’s compatible with alcohol markers.  The most popular ink pad to use with these are Momento Tuxedo black ink or My Favorite Things Hybrid Licorice Black ink.  My personal favorite is the My favorite things Hybrid ink but it’s personal preference.  Choosing the right paper also makes a huge difference on how they blend.  It’s best to use a specialty card stock such as Neenah Solar White or  Spectrum Noir card stock just to name a few.  These card stocks have a slick surface, which will help with the markers to sit on top of the paper longer for a better blend.

For todays card, I decided to use this Bird Crazy stamp set from stampers anonymous.  I think these birds have the funniest expressions and each bird has their own personality which I love.  I stamped it out using My favorite things black licorice hybrid ink on Neenah solar white card stock and chose out several colors to color the birds.  I made this bird very colorful since this was a very simple card.  I found this very funny sentiment to go along with these birds from the Dylusions stamp set from my stash.  To see a full step by step on how I made this card, please watch the video up above or head on over to my youtube channel.  For all the supplies I used on this card will be in the description below. I thank you guys so much for stopping by and please subscribe and follow for more inspirations and ideas.  I’m super excited that Tupelo Designs LLC is carrying copic markers and I’ll be sharing more products using these markers in the future.  Thank you so much and I hope to see you back next time.

Blog: http://enjoyscrappin2.com
Facebook: https://www.facebook.com/enjoyscrappin
Coloring group on FB: https://www.facebook.com/groups/enjoyscrappin2/
Instagram: https://www.instagram.com/enjoyscrappin2/
Twitter: https://twitter.com/enjoyscrappin2
Flickr: https://www.flickr.com/people/114801714@N07/
Tumblr: https://www.tumblr.com/blog/enjoyscrappin2
Bloglovin: https://www.bloglovin.com/people/enjoyscrappin2-9219655

http://static.inlinkz.com/ppr.js

Gerda Steiner Designs Nerdy Kitten with Prismacolor Pencils

IMG_8686

IMG_8687

Aloha Guys!

Today I’m making a card for Gerda Steiner Designs and I’m using this super adorable digital image called Nerdy Kitten.  Super cute, I just love his glasses and his sweet face.  I printed him out on Neenah Solar White 80lb paper and cut it using the Simon Says Stamp In stitches circle die.  I’m coloring this image with my Prismacolor pencils, which I haven’t used in a while.  I colored the image with the pencils and blended it using Gamsol. If you didn’t know, Gamsol is a solvent that will break down the colors to smooth it out.  I have a full tutorial up above on how I made this card.  I hope you enjoyed this card and I thank you very much for stopping by, I always appreciate it.  All the supplies I used will be linked below if you’re interested.  Thanks again 🙂

Follow me on my Social Media

Click on the links on the left side of my blog , which will direct you to my social medias.

Coloring Hibiscus with Spectrum Noirs and Some Tips-Tupelo Designs LLC

IMG_8641

IMG_8643

IMG_8642


Aloha Guys!

Today I’m making a DT card for Tupelo Designs LLC using the Hibiscus stamp set from Designs by Ryn.  I’ll be using Spectrum Noir alcohol markers and I’ll quickly go over some tips on using your bare rubber stamps without mounting it on Cling foam.  If you are interested in mounting your stamps on the cling foam, I’ll leave a link below where Jane shows the entire process.

These stamps Designs by Ryn are such a high quality red rubber stamps.  They are very deeply etched and detailed, so you won’t have any issues with getting a good crisp image.  I personally like to use a Rock-A-Block when I’m stamping bare rubber stamps.  That’s just my preference and you can play around with different types of block.  There’s a slight learning curve to it but once you get use to them, they are great.

I’ll be coloring most of my flowers off camera but I will share several petals and go over some things.  These flowers took over and hour to color, and I don’t think you want to watch me color for an hour.  You can go ahead and check out the video above for the whole process as well as some tips for using your bare rubber stamps.

I’m trying out couple different tools that I’ve never used before. I show it very briefly since the video was fast forwarded 4x.  One is the Blending tool that Mike, owner of Tupelo Designs LLC actually makes, and the other being the Teflon Bone Folder.  I’ll share more footage of using this tool in another video but I just gotta say, they are fantastic tools.  The blending tool is perfectly shaped so I can grab it very easily and makes blending much easier.  I have wrist problems so this tool is perfect for my hands.  The other tool that i’m fascinated by is the Teflon Bone folder.  I’ve seen others use it, and it was highly recommended by tons of people and now I know the reason why.  They give a really crisp scor and when you burnish the fold, there is no shinny residue.  It also feels good in my hands as well.  I’m super excited about these New tools for me, I’ll share more about it later on.  I hope you like this card and tips I gave was useful.  Please subscribe and follow for more inspirations and ideas.  Thank you so much for stopping by and I’ll see you guys next time.

Instagram, Twitter, Tumblr, Flick, Bloglovin

@enjoyscrappin2

#enjoyscrappin2

How to mount red rubber stamps onto Cling mount


Your Next Stamp’s Quirky Animal Set Five With Spectrum Noir

IMG_8625

IMG_8624

IMG_8623

Aloha Guys!

Today I’m super excited to play with this stamp from Your Next Stamp.  This stamp set is called Quirky Animal Set Five and it has this adorable dancing butterfly along with this sentiment that says “You make me do the Happy Dance!”  How cute is that.  I Love this sentiment so I wanted to use it with the butterfly.  These are actually my First set of stamps from them and they are super high quality photopolymer stamps and they have really unique whimsical designs.  I have one more set of stamps to share with you real soon, which is just as adorable as this one.  I had so much fun coloring the butterfly with Spectrum Noir Alcohol markers and I added some Music note die cut piece to embellish the card at the end.  I hope you like this card and you can see the entire process in the video link above.  I’ll leave all the links below for all the supplies I used on this card, if you want to check them out.  Thank you so much and I hope to see you guys next time.  Thanks again!

Follow me on Instagram, Twitter, Tumblr, Flickr, Bloglovin

@enjoyscrappin2

#enjoyscrappin2

http://yournextstamp.com

Gerda Steiner Designs June/July Challenge DT Card

IMG_8596

IMG_8595


Aloha Guys!

Today I’m making a card for Gerda Steiner Designs June/July Challenge card for the DT.  Gerda has a Progressive challenges every month and if you are not familiar with her challenges, here is change for you to get Free images every month.  Gerda’s progressive challenge is, you buy that months challenge image .  You use that image to participate in her challenge, then next month she’ll send you the Next months Image for Free.  Yes, Free.  As long as you participate in the challenge, you’ll be getting an image every month after that.  Pretty Amazing!!  Great chance to collect these adorable digital images.  So for the month of June and July it’s this Say Cheese Rabbit.  He’s super adorable!!  This image is not only perfect for cards, it’s also perfect for your scrapbook layout as well as for pocket letters.

Today I’m making a card using it and I color him with Spectrum Noir Markers.  I hope you enjoy the process video up above and join us for this Challenge.  I thank you guys so much for visiting and please subscribe and follow for more inspirations and ideas. I have listed all the supplies below if you want to take a look.  Thank you and see you next time

Follow me on Instagram, Twitter, Tumblr, Bloglovin

@enjoyscrappin2

#enjoyscrappin2

http://gerdasteinerdesigns.com

Through The Craft Room Door’s DT Challenge card

IMG_8292

**Sorry Guys!  For some reason, there was no sound on the video for this so I took it off.  I’ve been having some issues with that and I’m not sure why so I’ll try to figure out what’s going on.  I apologize.  Thank you for your understanding.
Aloha Guys!

Today I wanted to share this card I made couple weeks ago for Through the Craft Room Door’s Anything Goes DT challenge card that I forgot to share.  Through the Craft Room Door has a weekly Anything goes challenge that you can participate for some wonderful Prizes.  There is a Current challenge going on which I’ll link below for more details on the Challenge.

This was a Digital image that I worked with using a Mirror image technique which I thought was fun.  You can see a step by step on how i made this card up above.  Pretty simple card but I had a lot of fun making it.  I love elephants ❤

I hope you guys like this card and please subscribe and follow for more inspirations and ideas.  I thank you guys so much for stopping by and I’ll catch you guys next time.  All the information regarding the Anything goes challenge, click on the link below.  Thank you

http://craftrmdoor.ning.com

Gerda Steiner Designs Heavy Friends Card

FullSizeRender 3

Aloha Guys!

Today I’m making a card for Gerda Steiner Designs using the Heavy friends stamp set.  I’ve used this set quite often because I just adore these critters but I never used the Rhinasorous yet so I’ll be using him today for my card.  I cut out 5 frames using the MFT’s rectangle die and glued them all together to create a frame for my focal image.  I then cut another, same size as the frame to create a scenery for my focal image.  I used the Obsessions Impressions Clouds background stamp along with Tumble glass distress ink to create my scene.  Then I stamped out the Rhinasorous in Momento Tuxedo black ink and colored him using my Copic markers.  I put everything together to create this card.  For a complete process of this card, please watch the video above.  I’ll leave all the supplies I used for today’s card in the description below.  I hope you enjoyed this card and please subscribe and follow for more inspirations and ideas,  Thank you so much visiting and have a wonderful day 😀

Instagram, Twitter, Flickr Tumblr, Bloglovin

@enjoyscrappin2

#enjoyscrappin2

http://gerdasteinerdesigns.com