
Aloha Guy!
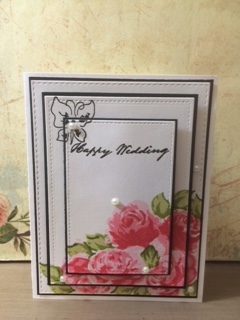
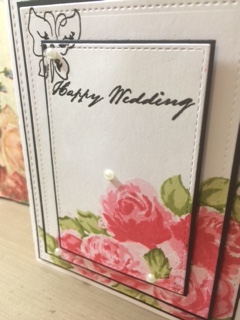
Today I’m sharing with you guys this card I made for Tupelo Designs LLC using Alte New Vintage Roses. This is also a layering stamp set that has multiple layers to create this stunning painterly look. This is an Awesome stamp set to have because it does all the work for you, all you need to do is stamp and there is your masterpiece. This stamp set was designed really well for stampers made by stampers, so they knew exactly how to create this stunning effect.
Today’s Card is basically layering and Stampining. I have 3 pieces of white card stock measuring
Large- 3 7/8×5 1/8
Medium 4 1/2×3 1/4
Small 2 5/8×3 5/8
I have 3 pieces of Black card stock
Lage 4x 5 1/4
Medium 4 5/8 x3 3/8
Small 2 3/4×3 3/4
With the 3 White pieces, line it up in the center, making sure that all sides are even. Then go ahead and stamp out your flowers and the leaves with all the layers. Press firmly since you’re stamping on 3 card stocks at once. You’ll need to make a mask for the flowers that will be over lapping as well as for the leaves. After all the stamping is done, I also used the same sentiment from the same set and stamped it out using Versafine Onyx Black pigment ink and embossed it with Clear embossing powder. I thought the top of the card panel looked empty so I also pulled out the Painted Butterflies set and stamped a small butterfly at the top left corner above the sentiment.
Attach the white card stock the coordinating black card stock leaving about 1/16th of a border all around each piece. My card base today is Neenah 110lb. Card stock which I cut it as a A2 size card panel. I attached all the components together, using foam adhesive for the top 2 layers. I also added some pearls and clear wink of stella for the last finishing touches. I do have a full Tutorial on my youtube channel if you’d like to check that out. I hope you enjoyed this card and please subscribe and follow for more inspirations and ideas. All the supplies I used will be listed below for your convenience. Thank you so much for stopping by and Much Mahalo
Blog: http://enjoyscrappin2.com
Facebook: https://www.facebook.com/enjoyscrappin
Coloring group on FB: https://www.facebook.com/groups/enjoyscrappin2/
Instagram: https://www.instagram.com/enjoyscrappin2/
Twitter: https://twitter.com/enjoyscrappin2
Flickr: https://www.flickr.com/people/114801714@N07/
Tumblr: https://www.tumblr.com/blog/enjoyscrappin2
Bloglovin: https://www.bloglovin.com/people/enjoyscrappin2-9219655